Showing posts with label Framelits. Show all posts

Saturday, March 29, 2014

Stamp Club


This month for stamp club we tried something a bit different. We used a template created by Angie Kennedy Juda to make five projects from one sheet of 12 x 12 Designer Series Paper. Here are the five projects we made:
 

This is the cutting template that Angie came up with:
 

Each stamp club member chose a different sheet of Sweet Sorbet DSP and cut it according to the template above and then scored the 3D projects. In addition to the designer paper we used card stock in Crisp Cantelope, Pistaccio Pudding, Pool Party and Summer Starfruit. We used ink pads in the same colours. 
 
Project #1  Treat Bag


For this project we also used a bit of ribbon and linen thread to hold the bag closed at the top. The sentiment is from the stamp set Perfect Pennants. The layers were cut with the Banners Framelits.  The photo on the right is the scoring guide for this treat bag.

Project #2  Pizza Box

 
The pizza box is topped with a cupcake made using the Cupcake Punch layered onto a Pool Party circle and Pistachio Pudding scallop circle.  In the photo on the right the dashed lines show where to score, the solid lines show where to cut.
 
Project #3  Tiny Triangle Box
 

We stamped a flower image from Petite Petals and punched it out with the coordinating punch.  The flower is layered onto a Pistachio Pudding circle and Pool Party scallop circle.  The box is tied shut with a bit of ribbon through tiny holes we punched in the top. 

Project #4  Thank You Card


This card uses the three thin strips of DSP.  We  cut a notch out of each end, and adhered them to the front, and folded over to the inside of the card.  For the focal image we stamped the smaller flower image from So Very Grateful and coloured it in with blender pens and ink from our ink pads. If you've never tried this before all you do is press the centre of your ink pad when it is closed, some of the ink will be transferred to the lid. Pick up the ink from the lid with your blender pen like it's a paint palette. We cut the image out with the Circle Framelits and layered it onto a punched out Crisp Cantaloupe scallop circle, and a Pool Party banner.

Project #5  Make a Wish Card


We used the 2" x 5 1/2" piece of DSP on this last project.  We stamped make a wish from Perfect Pennants in Pool Party and cut out all of the layers with the Banner Framelits.  The final embellishment were a bit of Pool Party Ruffled Ribbon attached with a Silver Brad, and an Itty Bitty punched flower in Summer Starfruit with a Rhinestone centre.

This class was a bit more involved than our typical stamp club class, but I just love the versatility of a concept like this one sheet wonder as it can be used with any designer paper you may have and whatever stamp sets suit the occasion you are making the projects for.  This also gives you great value for your Designer Paper!  The five projects can also be used individually, simply use the size of paper indicated in the template for the project you'd like to make and follow the scoring guide.

Go stamp something!
Diane


Wednesday, March 12, 2014

Stamping 101

Hi Stampers,

The first Tuesday of every month we have a Stamping 101 class where we make three projects that use simple techniques to produce quick, yet beautiful items. This month we made two cards and a treat holder. 


The first card used the Decorative Dots Textured Embossing Folder from the Saleabration brochure. The three stamps we used were all from different sets; the diagonal stripe image is from Gorgeous Grunge, the sentiment is from Create a Cupcake, and the flower and the coordinating punch are from the Petite Petals bundle. We used Very Vanilla and Strawberry Slush card stock and Early Espresso ink. 


The second card features the Designer Series Paper from Saleabration, Sweet Sorbet. The stamped image is from Perfect Pennants and we cut it out with the coordinating framelits and the Big Shot. The card stock layers are Crisp Cantelope and Pistacio Pudding. This was our fastest project, I think this card came together in about five minutes. 


Our last project was this Ghiradeli chocolate holder. We used the Envelope Punch Board to get the file tab shape at the top. The image on the front, from Apothecary Art, was stamped twice. The bottom layer was stamped in Coastal Cabana and cut out with the coordinating framelits, then it was stamped again in Wisteria Wonder from which we cut out the centre of the image with the circle framelits. We then used Stampin' Write markers in Daffodil Delight and Pear Pizzaz to colour the flowers and leaves. So cute!!

If you're interested in any of the Saleabration items they are available until March 31st. Contact me if you need a brochure. 

Go stamp something!
Diane

Wednesday, February 19, 2014

Stamp Club Mini Album

Hi Stampers!

At stamp club we usually make three projects, and each project focuses on a certain product or technique. Once in a while I like to do a larger scrapbook project instead. The scrapbooking members like to get some ideas for their memory keeping, and the card makers like to try something new and go home with a photo ready scrapbook project. 

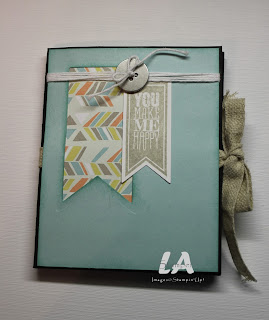
This month we're using a template I found on LA Stamper for a mini scrapbook using a 12x12 piece of card stock as the base. Here's her mini scrapbook, and the scoring and cutting template.  Click on the photo to see her post:

http://www.lastamper.blogspot.ca/2014/01/sale-bration-soup-stamps.html  
 
For our stamp club project I wanted to use the Sale-a-bration DSP, so that set the colour palette. I added Crumb Cake for the base, and Primrose Petals as an additional accent colour. 

 
For the cover we embossed a 3 1/2 x 4 1/2 piece of Pool Party card stock. (All panels are decorated with 3 1/2" x 4 1/2" layer)  Then we cut out a piece of Sweet Sorbet DSP with the Banners Framelits Dies and an image from the coordinating Perfect Pennants Stamp Set with the same framelits. Those two banners are attached to the Pool Party base with Retro Fresh Designer Washi Tape
 
 
When you open the cover, you reveal a pocket on the left and a photo panel on the right. The pocket has some Sweet Sorbet DSP attached, and the corners have been rounded. The photo panel has  a Summer Starfruit layer and two circles cut out with the Circle Framelits and glued only on the back and the edge near the fold so that a photo can be slipped underneath. The Pistachio Pudding circle is embellished with a flower from Banner Blast stamped in Primrose Petals. The Pool Party circle is stamped with an image from Perfect Pennants in Jet Black StazOn ink. 


When you open the Starfruit panel you reveal two photo/journaling panels. The Primrose Petals panel is embellished with an image from Petite Petals punched out with the coordinating Petite Petals Punch, and the hello from Perfect Pennants is stamped in Cantelope . The Crisp Cantelope panel is stamped with a diagonal striped banner image from Perfect Pennants in Primrose ink, the little banner and star are from Banner Blast and punched out with the Banner Punch, both free during Sale-a-bration!


When you flip those two panels down, you reveal the last four photo/journaling panels. Three more designs from the Sweet Sorbet DSP are used here, along with a piece of Pistachio Pudding. 

The flap over the top middle panel has an image from Perfect Pennants stamped in Pool Party and cut out with the coordinating Banners Framelits, mounted on a Summer Starfruit banner and a slim strip of Primrose card stock.  The flap over the right top panel was left plain, as I intend to mount a photo onto the flap, and a second photo underneath it on the DSP layer.

The bottom left panel simply has a strip of Crumb Cake card stock embossed with the Decorative Dots embossing folder, also free during Sale-a-bration. The bottom right panel has been stamped all over with the small splatter image from Gorgeous Grunge in Pustachio Pudding ink. Three different images from Banner Blast were stamped in Starfruit, Cantelope and Primrose, and punched out with the coordinating  Banner Punch, yes, both are free during Sale-a-bration.

Whew!  That was a lot of explanation for one project!  The truth is, once the paper is cut it comes together pretty quickly, the club stampers completed their scrapbooks in an hour. All that's left is to print out some pictures! 

If you'd like to get in on Sale-a-bration and have some of these free products to use in your paper crafting, contact me and I will get you a copy of the brochure. Can't wait?  Go to my Stampin' Up! website to view it online

Go stamp something!
Diane


Monday, February 10, 2014

Stamp Club

Hi Stampers,

We had our stamp club class last week, and we inked up some new products from the Occasion Catalogue and the Sale-a-bration flyer:


This card features the Starburst Sayings Bundle from the Occasions Catalogue and Banner Blast and the coordinating Banner punch from Sale-a-bration


The colour palette for this Valentine was inspired by the Sale-a-bration DSP Sweet Sorbet that you see running up the left side of the card.  It's great paper!  The base is Summer Starfruit, the next layer is  Pool Party and the heart is Calypso Coral.  We used the Hearts a Flutter stamp set and the coodinating framelits on the Calypso heart and to stamp the heart on the white layer.  I like that this card can be used as a valentine, and isn't too frilly or girly.

Good as Gold Simply Sent kit sneak peek Sale-A-Bration 2014, papermadeprettier

We also made a card from the Sale-a-bration card kit, Good as Gold Simply Sent, but I gave it away the day after stamp club for a friend's birthday and I hadn't taken a picture yet.  This is a picture I found on line that is similar to what we made, only I put the thin blue strip in between the gold strip and the for you.  Have some questions about Sale-a-bration and how you can get these items for free?  Email me at teachtostamp.gmail.com and I can answer your questions and get a copy of the flyer to you.

Go stamp something!
Diane


Thursday, January 9, 2014

Stamping 101

This week was Stamping 101!  The class that uses simple techniques to produce quick projects. This month we used some new products from the Occasions Catalogue as well as a couple of sneak peak products that will be available during Sale-a-bration!

First, some sweet little 3x3 cards using a new stamp set; Just Sayin' and the coordinating Word Bubbles Framelits Dies:


This lay out will work for any of the Just Sayin' sentiments in this set, these are just two examples. It's simply a 3"x6" piece of whisper white card stock scored and folded at 3". If you start with 12"x12" card stock you can make 8 cards from a single sheet. Then mount a 2 3/4" square of monochromatic DSP, Polka Dot Parade used here.  Next stamp your sentiment in the same colour ink, Rich Razzleberry and Marina Mist are shown in the picture and cut out with the coordinating framelits and your Big Shot. Finally, adhere your speech bubble. 
 

If you'd like to give a set of these as a gift, or make a bunch to have on hand for yourself, here's a great little box to hold them:
 

I got the idea for this little box from my friend Penny from Penny Tokens Stamping Spot. She gives great directions with loads of photos to show you how to make this with your Envelope Punch Board. I simply added another image from the Just Sayin' stamp set to hold the lid closed, but you could easily add some more stamping, emboss the lid, or add a belly band if you'd like to dress it up a bit. 

Finally, we used the new Angled Tag Topper Punch, but not to make a tag:
 

We used it to make a Ghirardelli chocolate holder. Clever right?  There was a project using this punch to make a nugget holder in Stampin' Success (our demonstrator magazine) and then of course Stampers everywhere started making different versions. For this one we started with a 5 1/2" x 2" piece of Very Vanilla card stock, scored at xx and xx.  Then punch both ends with the Angled Tag Topper Punch and decorate. My sister-in-law gave me this Washi Tape dispenser for Christmas, and I thought this was the perfect chance to break it in!


I tore off two strips of Washi and adhered them as the background. Then I stamped three flag images in Tempting Turquoise, Bermuda Bay, and Coastal Cabana ink. Don't recognize those images? That's because they're from the stamp set Banner Blast that will only be available during Sale-a-bration from January 28th until March 31st. There is also a coordinating Banner Punch which was used to punch out the flag shapes. Lastly, we slid in the chocolate and tied some Bakers Twine through the holes at the top. I think I might have to make a Valentines version for my coworkers. Too cute!

Go stamp something!
Diane


Tuesday, November 5, 2013

Stamping 101


Hi Stampers!

Tonight was Stamping 101!  We started with one sketch two ways, and no tools other than a paper cutter:

 
Yikes that's an off centre picture!  Sorry about that, but the card is still cute.  It uses Crisp Cantaloupe and Strawberry Slush card stock , the Happy Day stamp set and a little Daffodil Delight ribbon.  The Medallion image is stamped repeatedly in Crisp Cantaloupe to create the look of designer paper, then the greeting, happy day, is stamped in Strawberry Slush.  This stamp set comes with three other sentiments and any of them would look great on this card.
 
Simple sketch take two:
 

Same layout with a single bold image, Christmas Star stamped in Smoky Slate and the sentiment in Night of Navy.   A large Rhinestone is added to the centre for sparkle.

Our last project is not quite as simple, this one used a few tools and is totally worth the extra effort:
 

Love it!  It's a Chapstick or lipstick box!  Super cute right?  Everyone needs one of these in their stocking this Christmas!  It's made with a small pool party box (click here for dimensions) and two dresses cut from the Winter Frost Designer Series Paper Stack using a dress from the Dress Up Framelits and the Big Shot.  We decorated with a small length of Pool Party Ruffled Ribbon and a large Rhinestone.  Scoring the card stock for the box takes a few minutes, but once that's done it's a snap.  This project just makes me happy!
 
Go stamp something!
Diane


Monday, October 28, 2013

Card in a Box

Hi Stampers!

So I just had to try the card in the box I posted a link to on Friendly Friday, and I love it!  Here's how mine turned out:

 
I used Crumb Cake cardstock for the base, Season of Style Designer Series Paper, the Festive Flurry stamp set and coordinating framelits, a little Cherry Cobbler 1" Grosgrain Ribbon and the sentiment is from Joyful Christmas.  On the video all of the measurements are in centimetres, but our Stampin' Up! paper cutters have all of the measurements in both centimetres and inches, so that was no problem.  Our paper is half an inch shorter, so using her measurements there is no tab.  Instead I used a piece of scrap glued to both edges on the inside to hold the box together.  Here's a view from of the side:
 

Do you love it too?  It takes a bit longer than the cards I usually post, but the extra time certainly pays off when someone opens it and all those flaps pop open!  When this card is flat it is larger than a standard card, so I used my Envelope Punch Board to make a 6" x 6 1/2" envelope with Crumb Cake card stock. 


This was a very satisfying way to pass an afternoon, I recommend giving it a try when you have a little time for stamping set aside. 

Go stamp something!
Diane


Wednesday, August 28, 2013

Memory Jar

For my nephew's birthday I gave my sister in law this memory jar of her baby shower:
 

The label on the jar is made with the stamp set Baby Prints, Apothecary Accents Framelits and the new Pretty Print embossing folder.  I attached the label to the jar with sticky strip (nothing else would adhere to the smooth curved glass surface).  I made a small heart garland around the top using the small heart punch and strung them together with fishing line, which is tied to the hinge at the back of the jar.
 
 
The top of the jar is decorated with the adorable feet from the Baby Prints stamp set, the blue scallop circle is from the Perfect Pennants Bigz L die.
 
 
I printed off some wallet sized photos from the shower and used them to make a really simple accordion fold photo album which is made with two 12" strips of whisper white cardstock joined in the middle with a little bit of Designer Series Paper.  The photos are attached with all of our different Designer Washi Tapes.
 
 
One side of the album has the portrait photos, the other side has the landscape photos. 
 
 
At the shower, guests were asked to write notes to the mother-to-be.  The notes are inside these skinny envelopes.  These were placed inside the jar with the photos.
 
Do you have an event or memory that needs to be documented?  A memory jar is a fun way to keep that memory, and it's also less overwhelming than a traditional scrapbook can sometimes be.
 
Go stamp something!
Diane 


Wednesday, August 7, 2013

Stamping 101


Hi Stampers,
Today I want to show you the two cards we made at Stamping 101 last night!  The first card we made was a Christmas card: 
 I know you think it's a little early, but it's good to get thinking about these things before the time crunch, when you have the time to enjoy the process.  Wondering where we got that bow?  Paper bows are all the rage right now, and we made ours with a 2" x 4" piece of DSP and an oval punch.  You simply punch out 4 ovals, fold two of them in half (but a soft fold with no crease) to be the loops, cut a notch out of the other two to make the tails of your 'ribbon', glue them all together with Tombo liquid glue or glue dots, then glue a little 1/4" strip around the centre.  Cute! 

We used the Santa image from the Ronald McDonald House Charities stamp set, Tag It
Tag It

We also used Season of Style DSP for the bow and the strip on the left with the tiny triangles.  The card stock colours are Crumb Cake, Cherry Cobbler and Old Olive.  The Cherry Cobbler piece is run through the big shot with the Stripes textured embossing folder.  Are you also wondering how we got the Whisper White layer that shape?  This stamp set is designed to coordinate with the Chalk Talk Framelits, but I don't have those yet, so we used a framelit from the Lablels Collection and trimmed off the sides a little:

See how we just snipped that bracket shape off the sides?  Sometimes you need to find a way to work with what you have!
 
For our second card we used everyone's new favourite product, washi tape!!

We used seven different designs from the Season of Style, Witches' Brew and Epic Day collections.  We started with the centre newsprint design piece and worked out from there.  This is really fast because you just stick and rip, and because it's not supposed to look perfect, it's even more fun! 

Feel Goods Clear-Mount Stamp Set

Then we used a framelit from the Apothecary Accents Framelits and the Big Shot to cut out the window and stamped a sentiment from the Feel Goods stamp set on the front of the card base with Jet Black StazOn ink.  LOVE this stamp set!  We used the stamp-a-ma-jig to help us line up the image in the window.  A few dimensionals on the washi tape layer, two candy dots from the neutrals collection and we were done!  Quick and cute with a nice WOW factor!

Thanks to the girls who came to stamp with me last night, it was fun to catch up!  And thanks to you for stopping by the blog today.

Go stamp something!
Diane

Monday, August 5, 2013

You're Amazing!

Hi Stampers,

Yesterday we had a first birthday party to go to.  Of course the first thing I start thinking about is what kind of card I'm going to make!  I flipped though my stamp sets and settled on You're
Amazing.
You're Amazing Clear-Mount Stamp Set
I didn't think I would use this set very much when I got it, how often do I need a circus themed card or scrapbook page?  I've actually used it a lot--in a non-circus kind of way.  The You're Amazing and Happy Birthday sentiments have come in really handy when I want the words to take centre stage in my project, they're nice and bold and look great stamped in a vibrant colour.  The hot air balloon actually makes a nice soft background image when stamped in a subtle colour or used tone on tone.  The tickets have a coordinating punch, love that!  The image I haven't really used much is the elephant, until now...


He is so cute in his party hat!  Since I was making a first birthday card, I decided to go with bright colours: Pacific Point, Real Red and Pumpkin Pie.  I used four of the images from You're Amazing, and two images from That's the Ticket, and at the last minute I added the lines in the background from Gorgeous Grunge.  I just felt like the background needed something.  Since I didn't have a DSP to coordinate with my colour combination, I made my own using the hot air balloon image and the tiny ticket image and the three colours of ink on a 1 1/4" strip of Whisper White card stock.  I used one of the Apothecary Accents Framelits Dies to cut out Happy Birthday and a couple of punches for the adorable party elephant.  Two mini brads and a few dimensionals later, here we are, a cute birthday card!
 
I think since he's one he won't care what his card looks like, but I love it, and I think his mom will too.  Happy Birthday Luke!!  Think about what events you have coming up and...
 
Go stamp something!
Diane