Showing posts with label Rhinestones. Show all posts

Thursday, May 29, 2014

2014-2016 In Colors

The new in colors will be available starting June 2nd, and I think you're going to like these colors!

This first project uses all five of the new colors:


The base of this card in Tangerine Tangelo, the stripes are Lost Lagoon, the greeting is Mossy Meadow, the paint splotch in the bottom corner is Hello Honey, and the heart is Blackberry Bliss. The 'painted' images are all from a new stamp set called Work of Art, and the greeting is from Yippee-Skippee!


This second card also uses the new stamp set Work of Art.  The streaks of paint are in Blackberry Bliss, Hello Honey and Lost Lagoon.  The splatters are in Melon Mombo, and the sentiment is in Black StaxOn. I just Love the simplicity of this card-- Whisper White card stock, a single stamp set and a few ink pads.  I have a feeling I"ll be making more of these.


This little bag uses a sheet of Designer Series Paper from the new 4 1/2 x 6 1/2 paper stack, Moonlight.  This design features Hello Honey and Blackberry Bliss. The closure on top is also Hello Honey using one of the tag topper punches. The tiny flower is punched with the Itty Bitty Punch Pack, the stamped flower is from Petite Petals, the greeting is from Label Love. All of these are in Blackberry Bliss. 

The DSP is scored along the long side at 1", 3", 4", and 6".  It is scored along the short side at 1". This bag comes together pretty easily. Here is a link to a video of Sam Donald that shows how to make it start to finish.  Her blog is full of wide variety of boxes and bags.  When I need a packaging idea that's where I look first.

I hope you've enjoyed this small taste of the 2014-2016 In-colours, there will be much more coming!

Go stamp something!
Diane


Tuesday, November 5, 2013

Stamping 101


Hi Stampers!

Tonight was Stamping 101!  We started with one sketch two ways, and no tools other than a paper cutter:

 
Yikes that's an off centre picture!  Sorry about that, but the card is still cute.  It uses Crisp Cantaloupe and Strawberry Slush card stock , the Happy Day stamp set and a little Daffodil Delight ribbon.  The Medallion image is stamped repeatedly in Crisp Cantaloupe to create the look of designer paper, then the greeting, happy day, is stamped in Strawberry Slush.  This stamp set comes with three other sentiments and any of them would look great on this card.
 
Simple sketch take two:
 

Same layout with a single bold image, Christmas Star stamped in Smoky Slate and the sentiment in Night of Navy.   A large Rhinestone is added to the centre for sparkle.

Our last project is not quite as simple, this one used a few tools and is totally worth the extra effort:
 

Love it!  It's a Chapstick or lipstick box!  Super cute right?  Everyone needs one of these in their stocking this Christmas!  It's made with a small pool party box (click here for dimensions) and two dresses cut from the Winter Frost Designer Series Paper Stack using a dress from the Dress Up Framelits and the Big Shot.  We decorated with a small length of Pool Party Ruffled Ribbon and a large Rhinestone.  Scoring the card stock for the box takes a few minutes, but once that's done it's a snap.  This project just makes me happy!
 
Go stamp something!
Diane


Saturday, November 2, 2013

Christmas Stamp-a-Stack Card One

Hi Stampers!

My annual Christmas Card Stamp-a-Stack is fast approaching on November 16th!  Here is one of the cards we'll be making:


The idea of a stamp-a-stack is that the cards are quick enough that you can complete a stack of them in one sitting, but still nice looking cards you'll be proud to hand out to your friends and family. A single layer card is about as simple as you can get!  Using the gorgeous Joyful Christmas stamp set and three rich colours of ink: Night of Navy, Cherry Cobbler and Garden Green are the trick to making this card work, along with a few rhinestones for some sparkle. 
 

I have a few ladies who stamp with me who like a bit more to their cards.  They can step their cards up a little by adding the second, hand cut layer to the poinsettia image which is popped up on a dimensional.  E-mail  me if you're interested in joining us at the Stamp-a-Stack.

Have you started working on your Christmas cards yet?  
 
Go stamp something!
Diane


Wednesday, October 30, 2013

Altered Designer Series Paper

Hi Stampers!

I saw this card online by Karen Day and immediately knew I wanted to make a version of it:


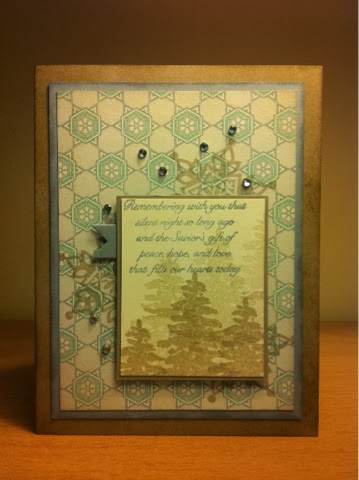
At first I thought it was made with Stampin' Up! products, but upon closer inspection I realized it wasn't, but was still inspired to make something like it. Here's my ,less professionally photographed, card:


I used Festive Flurry and Evergreen stamp sets, Crumb Cake and Smoky Slate card stock and ink. I did use Winter Frost DSP, but it was too crisp and white for this card, so I sponged it all over with Very Vanilla ink:
 

In this picture you can kind of see how the sponged DSP has a softer more vintage feel to it. For a finishing touch a added some tiny Rhinestones for a little Christmas sparkle :)

Go stamp something!
Diane