Sunday, November 24, 2013

HOLIDAY SALE!!

Hi Stampers,

Sorry I haven't posted for a while, we've had a string of bad news here, but things seem to be settling down so...back to stamping!  Stamping is good for the soul and it has been an outlet for me during these unsettled days.

What's better than stamping?  How about a sale on the stamping supplies you've been needing!!!
Here it is:

http://www.stampinup.com/ECWeb/ItemList.aspx?categoryID=1681&dbwsdemoid=2040904

http://www.stampinup.com/ECWeb/ItemList.aspx?categoryID=1681&dbwsdemoid=2040904

http://www.stampinup.com/ECWeb/ItemList.aspx?categoryID=1681&dbwsdemoid=2040904

http://www.stampinup.com/ECWeb/ItemList.aspx?categoryID=1681&dbwsdemoid=2040904
 
 
There are some great things on this list right?!?  Make a wish list and pass it on to your loved ones.  Most husbands appreciate knowing exactly what you want!  Just make sure if you're ordering a stamp set that comes in different languages that you use the correct item number.  Don't ask me why I'm making that recommendation!
 
The sale ends December 2nd, make sure you don't miss the deadline!
 
Go stamp something for someone you love!
Diane


Sunday, November 10, 2013

Wedding Weekend

Hi Stampers!

This weekend my husband and I had two weddings to celebrate, so out came the whisper white card stock:


I chose the stamp set Apothecary Art for these occasions, I think it has a formal feel to it which is perfect for weddings.  For the focal point I coloured the image with Night of Navy and Pear Pizzaz Stampin' Write markers, then cut it out with the Labels Collection Framelits. 

Lots of layers, some texture with the Big Shot, some shine from the organza ribbon and pearls.  A classic wedding look. 

What special events are coming up in your life?  Show someone how much you care with a hand stamped card to mark the occasion. 

Go stamp something!
Diane

Tuesday, November 5, 2013

Stamping 101


Hi Stampers!

Tonight was Stamping 101!  We started with one sketch two ways, and no tools other than a paper cutter:

 
Yikes that's an off centre picture!  Sorry about that, but the card is still cute.  It uses Crisp Cantaloupe and Strawberry Slush card stock , the Happy Day stamp set and a little Daffodil Delight ribbon.  The Medallion image is stamped repeatedly in Crisp Cantaloupe to create the look of designer paper, then the greeting, happy day, is stamped in Strawberry Slush.  This stamp set comes with three other sentiments and any of them would look great on this card.
 
Simple sketch take two:
 

Same layout with a single bold image, Christmas Star stamped in Smoky Slate and the sentiment in Night of Navy.   A large Rhinestone is added to the centre for sparkle.

Our last project is not quite as simple, this one used a few tools and is totally worth the extra effort:
 

Love it!  It's a Chapstick or lipstick box!  Super cute right?  Everyone needs one of these in their stocking this Christmas!  It's made with a small pool party box (click here for dimensions) and two dresses cut from the Winter Frost Designer Series Paper Stack using a dress from the Dress Up Framelits and the Big Shot.  We decorated with a small length of Pool Party Ruffled Ribbon and a large Rhinestone.  Scoring the card stock for the box takes a few minutes, but once that's done it's a snap.  This project just makes me happy!
 
Go stamp something!
Diane


Saturday, November 2, 2013

Christmas Stamp-a-Stack Card One

Hi Stampers!

My annual Christmas Card Stamp-a-Stack is fast approaching on November 16th!  Here is one of the cards we'll be making:


The idea of a stamp-a-stack is that the cards are quick enough that you can complete a stack of them in one sitting, but still nice looking cards you'll be proud to hand out to your friends and family. A single layer card is about as simple as you can get!  Using the gorgeous Joyful Christmas stamp set and three rich colours of ink: Night of Navy, Cherry Cobbler and Garden Green are the trick to making this card work, along with a few rhinestones for some sparkle. 
 

I have a few ladies who stamp with me who like a bit more to their cards.  They can step their cards up a little by adding the second, hand cut layer to the poinsettia image which is popped up on a dimensional.  E-mail  me if you're interested in joining us at the Stamp-a-Stack.

Have you started working on your Christmas cards yet?  
 
Go stamp something!
Diane


Wednesday, October 30, 2013

Altered Designer Series Paper

Hi Stampers!

I saw this card online by Karen Day and immediately knew I wanted to make a version of it:


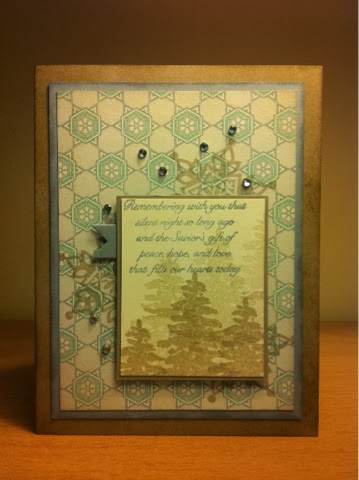
At first I thought it was made with Stampin' Up! products, but upon closer inspection I realized it wasn't, but was still inspired to make something like it. Here's my ,less professionally photographed, card:


I used Festive Flurry and Evergreen stamp sets, Crumb Cake and Smoky Slate card stock and ink. I did use Winter Frost DSP, but it was too crisp and white for this card, so I sponged it all over with Very Vanilla ink:
 

In this picture you can kind of see how the sponged DSP has a softer more vintage feel to it. For a finishing touch a added some tiny Rhinestones for a little Christmas sparkle :)

Go stamp something!
Diane


Monday, October 28, 2013

Card in a Box

Hi Stampers!

So I just had to try the card in the box I posted a link to on Friendly Friday, and I love it!  Here's how mine turned out:

 
I used Crumb Cake cardstock for the base, Season of Style Designer Series Paper, the Festive Flurry stamp set and coordinating framelits, a little Cherry Cobbler 1" Grosgrain Ribbon and the sentiment is from Joyful Christmas.  On the video all of the measurements are in centimetres, but our Stampin' Up! paper cutters have all of the measurements in both centimetres and inches, so that was no problem.  Our paper is half an inch shorter, so using her measurements there is no tab.  Instead I used a piece of scrap glued to both edges on the inside to hold the box together.  Here's a view from of the side:
 

Do you love it too?  It takes a bit longer than the cards I usually post, but the extra time certainly pays off when someone opens it and all those flaps pop open!  When this card is flat it is larger than a standard card, so I used my Envelope Punch Board to make a 6" x 6 1/2" envelope with Crumb Cake card stock. 


This was a very satisfying way to pass an afternoon, I recommend giving it a try when you have a little time for stamping set aside. 

Go stamp something!
Diane


Friday, October 25, 2013

Friendly Friday

Hi Stampers!

I saw this card on pinterest and I LOVE it!  I was happy to discover that Monica Gale, the blogger who made this card, posted a video of how to make it:

card in a box video-001
 
 
The only thing about this video is that Monica is in the UK, so she uses A4 paper, which is a bit longer than ours, and her measurements are metric, however, the concept of this card is fantastic and I'm sure it won't take much to duplicate this card with our card stock.  I'll definitely be giving this a try over the weekend!
 
If you beat me to it please post a link to your card or some tips in the comments for the rest of us!
 
Go stamp something!
Diane