Hi Stampers!
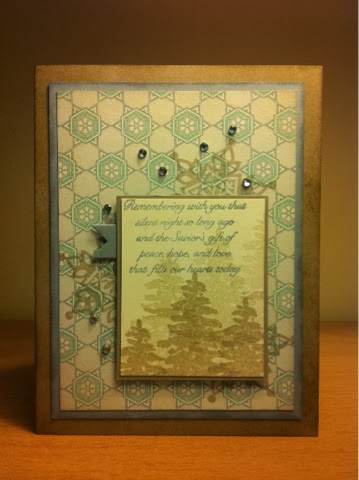
My featured friend this week is a person I actually stamped with in person! Last night I attended a demonstrator event at my friend Jenilee's in Chilliwack. Looooong drive, but totally worth it! Jenilee has a beautiful large stamping studio above her garage and it was such a pleasure to be in such a large space that is dedicated just to stamping. I'd love to show you a few pictures of her space, but I didn't bring my camera...so I have none. Bad blogger! I apologize. What I can show you a picture of is the card Jenilee designed for our Holiday Catalogue make and take:
Cute right! (ignore how my ribbon got bent on the car ride home!) It uses one of the new paper stacks,
Winter Frost, and the stamp sets
Calm Christmas and
Festive Flurry (the smallest snowflake is stamped on top of the dove in
Illuminate Glimmer ink). Like that ribbon? It's the new
Silver 1/8" ribbon found in the Holiday Catalogue. You have to feel it, silky and cool. It's just shiny and nice. Other products used for this card are
Whisper White and
Pool Party cardstock,
Smoky Slate ink, and
Versamark ink with our
white embossing powder for the sentiment. Jenilee is planning to use this card for her holiday stamp-a-stack classes, I might have to do the same. Thanks for the great card Jenilee!
The second project we made was one I brought to show everyone, it's based on a card that Shelli showed on stage at convention. Hers was a brightly coloured birthday card, mine uses that great
Winter Frost Designer Series Paper Pack from the Holiday Catalogue again, and I added a gift card holder to her design:
There's that paper bow again, but how did it get so big?!? On Shelli's card she used the new
Gift Bow Bigz L Die and the
Big Shot to make the big paper bow, but I don't have that yet. I had to be a bit creative and used our
Oval Collection Framelits with my
Big Shot to cut out four ovals and used the exact same technique as we did with the large oval punch at
Stamping 101 on Tuesday, only bigger. Jenilee happened to have the Gift Bow Die, so we gave that a try too:
Both methods work, the Gift Bow Die is quicker and easier to put together (less steps) but the main bow piece is longer than the paper stack sheets. If you're using cardstock or full sized designer paper though it's great, you can get two bows out of one sheet of 8 1/2 x 11 cardstock. With the framelits, you can get one bow of similar size out of one of the paper stack sized sheets. It just depends which look you prefer for your project. What? You don't have a
Big Shot yet? It's okay, Christmas is coming. Start dropping hints now. Until then Stampin' Up! also has a package of printed die cut pieces called
Pretty Presents Designer Bows. They come with two different sized double-sided designs:
It was a pleasure to spend time with the demos Jenilee had gathered there, such a fun group! We'll definitely have to do it again.
Go stamp something! (and maybe add a paper bow...)
Diane