Showing posts with label Big Shot. Show all posts

Tuesday, August 12, 2014

Big Shot Bundle: Bright & Beautiful

Have you heard about the amazing promotion Stampin' Up! is running in August?

 
Today my Holiday Catalogue preorder arrived, and with it the Bright & Beautiful Stars Bundle.  I couldn't wait to ink those stamps and run the images through my Big Shot with the coordinating Star Framelits Dies!  Here's what I made:


Framelit Dies make projects like this one quick and fuss free. I used Garden Green, Early Espresso, and Cherry Cobbler to stamp, then placed the card stock on the cutting plate and magnetic platform like this:
 

Place the second cutting plate on top, roll through the Big Shot and assemble your card. This card base is Crumb Cake, the designer series paper if from a paper stack that is in the Holiday Cataligue called Trim the Tree (let me know if you need a Holiday Catalogue, I have them here).  I attached the top two star layers with Dimensionals to add a little height, and I curled the sentiment with my fingers a little to make it more like a banner or scroll. 

Look forward to seeing more projects using this stamp set and the Star Framelit Dies, I'm not done with these yet!
 
Go stamp something!
Diane

Wednesday, April 16, 2014

Stamping 101


This class focused on two current paper crafting trends; water colouring and gold. Both cards use the stamp set Happy Watercolor:


We stamped the colour wash image three times in Wisteria Wonder, then stamped the sentiment in Jet Black StazOn. The flowers were punched with the Petite Petals Punch, the tiny gold flowers were punched with the Itty Bitty Punch Pack. A little Rhinestone Jewel is added to the centre of each gold flower and the leaves were made with the Little Leaves Sizzlit and the Big Shot.


For our second card we used a technique called emboss resist. We stamped the floral image with Versa Mark ink and heat embossed it with White Embossing Powder. Then we painted over the image with an Aqua Painter and ink from the lid of our classic ink pads in the 2013-2015 in-colors. We attached a strip of the gold striped design from the washi tape collection; Watercolor Wonder. We stamped thank you, also from Happy Watercolor, directly onto the wash tape with Jet Black StazOn. Once the floral panel was dry, we attached it to the card with two pieces of the gold polka dot design from the same collection. Fast and easy, and it looks better in real life.  Gold is tricky to photograph!

Our third project was a simple little gift box, but since I forgot to take a photo of it, I'll have to save that idea for another post.
 
Go stamp something!
Diane

Sunday, November 10, 2013

Wedding Weekend

Hi Stampers!

This weekend my husband and I had two weddings to celebrate, so out came the whisper white card stock:


I chose the stamp set Apothecary Art for these occasions, I think it has a formal feel to it which is perfect for weddings.  For the focal point I coloured the image with Night of Navy and Pear Pizzaz Stampin' Write markers, then cut it out with the Labels Collection Framelits. 

Lots of layers, some texture with the Big Shot, some shine from the organza ribbon and pearls.  A classic wedding look. 

What special events are coming up in your life?  Show someone how much you care with a hand stamped card to mark the occasion. 

Go stamp something!
Diane

Tuesday, November 5, 2013

Stamping 101


Hi Stampers!

Tonight was Stamping 101!  We started with one sketch two ways, and no tools other than a paper cutter:

 
Yikes that's an off centre picture!  Sorry about that, but the card is still cute.  It uses Crisp Cantaloupe and Strawberry Slush card stock , the Happy Day stamp set and a little Daffodil Delight ribbon.  The Medallion image is stamped repeatedly in Crisp Cantaloupe to create the look of designer paper, then the greeting, happy day, is stamped in Strawberry Slush.  This stamp set comes with three other sentiments and any of them would look great on this card.
 
Simple sketch take two:
 

Same layout with a single bold image, Christmas Star stamped in Smoky Slate and the sentiment in Night of Navy.   A large Rhinestone is added to the centre for sparkle.

Our last project is not quite as simple, this one used a few tools and is totally worth the extra effort:
 

Love it!  It's a Chapstick or lipstick box!  Super cute right?  Everyone needs one of these in their stocking this Christmas!  It's made with a small pool party box (click here for dimensions) and two dresses cut from the Winter Frost Designer Series Paper Stack using a dress from the Dress Up Framelits and the Big Shot.  We decorated with a small length of Pool Party Ruffled Ribbon and a large Rhinestone.  Scoring the card stock for the box takes a few minutes, but once that's done it's a snap.  This project just makes me happy!
 
Go stamp something!
Diane


Wednesday, October 2, 2013

Stamping 101

Hi Stampers!

So the whole concept behind Stamping 101 is that we use simple techniques to create projects that are cute or beautiful, but that don't require too many products or a lot of time. Last night I think we really met that goal. We made 3 projects and were done in 45 minutes!


Our first project was this Trick or Treat card. This card was simple, and didn't take too long, but we did use a fair amount of product.  We used the retired spider web embossing folder on Basic Grey card stock, then ran the Silver Encore Pad really lightly over the raised web design. A little strip of each design from the  Witches Brew Designer Washi Tape add some colour and interest. Finally, we stamped the Trick or Treat image from Tags 4 You on Very Vanilla, punched it out with the Bracket Label Punch and attached it with a Stampin' Dimensional


Next up, a card with no layers, no Big Shot, no punches. This card uses the magic of two-step stamping!  This card was simple and we didn't need a lot of products, but it took a little bit longer to stamp.  We started by stamping the different leaves from Gently Falling; each in a different colour onto Baked Brown Sugar card stock. We used Cajun Craze, Daffodil Delight, Pumpkin Pie, Pear Pizzaz, and Crumb Cake ink.

Gently Falling Clear-Mount Stamp SetTags 4 You Wood-mount Stamp Set

Next we stamped the coordinating outline images over the coloured images, all using Baked Brown Sugar ink. Then we sponged the edges with a little Soft Suede ink. Finally, we stamped the Sentiment with VersaMark ink, and sprinkled on some Gold Embossing Powder which we melted with the Heat Tool. I took about 20 pictures of this card, but none were able to capture the way it looks in real life. The gold really stands out against the muted autumn colours. 


Then we used up some retired DSP to make this adorable, I mean spooky, Halloween treat holder.  This project only requires a few products, was simple and really fast.  We used the amazing Envelope Punch Board and the measurements for a gift card holder to make these, which means you only need a 5x5 piece of paper!  We added a little ribbon and that same image from Tags 4 You.  Slide in a Halloween candy bar and we're done!  Five minute project. Love that!  These could easily be made for any holiday or occasion.  It even looks cute with just the little bit of ribbon and nothing else.

Sometimes it's good to get back to stamping basics and create projects that remind you of what attracted you to paper crafting in the first place. What is your favorite simple technique?  

Go stamp something!
Diane

Wednesday, September 18, 2013

Stamp Club Class

Tonight's class was all about the Envelope Punch Board!  All the ladies loved using the punch board, it's simple and quick and the results are great every time!  We warmed up by making envelopes for this card:


The card is on a Pumpkin Pie base, the stripes on the white layer are made using the masking tape technique in Crumb Cake and Soft Suede. The leaves are die cut with the Autumn Accents Bigz Die and the Big Shot, then stamped with the Wonderfall stamp set in Cajun Craze, Crushed Curry, Early Espresso and Soft Suede. The thank u is cut with the Expressions Thinlits in Red Glimmer Paper (cut down from the word Thankful). 

Our next project used the Envelope Punch Board to make a file folder card:
 
We glued the hexagon pattern of Epic Day Designer Series Paper onto the card front and the lined paper pattern to the edge of the inside, then we used the punch on the punch board to get the curved shape for the file folder tabs (like in the video from this post). To finish the card we stamped you make me happy from Hello Lovely in Calypso Coral and mounted it on the front, and we stamped XOXO from Oh, Goodie!, also in Calypso Coral on the tab. Cute!!  Stamping with friends is so much fun, do you have someone to stamp with?  You are always welcome to come and join us!

Go stamp something!
Diane


Monday, September 16, 2013

Envelope Punch Board Love

Hi Stampers!

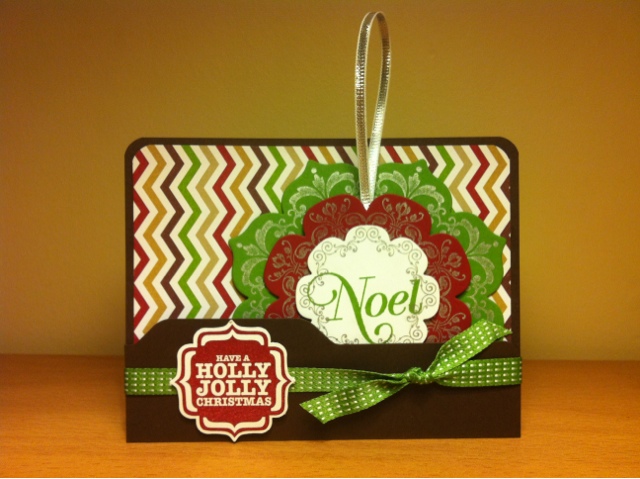
This punch board is the coolest new tool!  I've only had a couple of hours to play with it but I love it!!  Of course it makes beautiful, polished looking envelopes out of any type of paper you like, but you can also make boxes, scrapbooks, and cards with little tabs that look like file folders!  I followed Patty Bennett's tutorial (that I shared on Friendly Friday) and made this pocket card that holds a simple ornament:

 
The base is a 5-1/2 x 6 piece of Early Espresso cardstock, lined with DSP from the Season of Style Paperstack. Have a Holly Jolly Christmas from Tags 4 You is stamped in Cherry Cobbler and punched out with the Label Bracket Punch.  (you can get these in a bundle and save!)  That cute tab you see on the Early Espresso cardstock is made with one of the punches on the new amazing Envelope Punch Board!  Add it to your must have list now!!
 

The ornament is made with the Daydream Medallions stamp set inked with the Silver Metallic Encore Pad, stamped onto Gumball Green, Cherry Cobbler and Whisper White cardstock.  The layers are cut out with the Floral Frames Framelits Dies and the Big Shot. Noel is from Greetings of the Season and the hanger is made with some Silver 1/8" Ribbon from the Holiday Catalogue.  Doesn't it make you want to start preparing for the holidays?

Go stamp something!
Diane


Wednesday, September 11, 2013

Thankful Wonderfall


Do you love the Wonderfall stamp set as much as I do?  It just makes me happy every time I  pull it off the shelf!


I have to say, I would love it even more if there were framelits that coordinated, but it came out before Stampin' Up! started to carry them, so I guess we'll have to make due with the Autumn Accents Bigz Die. Since you can't stamp your image and then line it up to cut it out like you can with your framelits, we have to do things a little differently. For this set, run your cardstock through the big shot first to cut out your leaf shapes, then stamp them. If your image is a bit crooked it's okay, because once you sponge the edges, which makes them look more realistic and beautiful anyway, you can't tell!  I got the basic idea for this layout from a project I saw on Pinterest made by Dani Dziama. 

For those of you wondering if it's tricky to work with the Expressions Thinlits Dies, the answer is yes, unless you put a little piece of wax paper I between the die and the cardstock:


A feature of these framelits that can be really helpful is that it has some tiny holes on the back of the die.  If you poke a toothpick through those tiny holes, your cardstock pops right out. Then all you need to do is add a bit of Tombo liquid glue and you're set!  

What stamp set makes you happy every time you see it?

Go stamp something!
Diane


Tuesday, September 3, 2013

Stamping 101

Hi Stampers!

Tonight was Stamping 101!  We made two cards, one all occasion and one Christmas:


We started with this Merry card in Cherry Cobbler.  We used the Expressions Thinlits Dies and the Big Shot to cut out the word Merry, and the Argyle Embossing Folder on the Cherry card stock. We finished off our card with a few little pieces of Season of Style Designer Series Paper.  Cute!

Expressions Thinlits Dies


Our second card uses the stamp sets Gorgeous Grunge and Yippee-Skippee!  The card base is pool party, and the next layer is Crisp Cantaloupe.  We used the same colours of ink along with Basic Gray, the 1-3/4" circle punch, 2-3/8 scallop circle punch and presto zesto, we had an all occasion card ready to go!  It only took about 30 minutes to complete both cards!

Deciding is the most time consuming part!  Choose a clean and simple design and see if you can find 30 minutes to craft. I found these ideas on Pinterest and adapted them slightly to suit the supplies I had on hand. It's a great place to find some simple ideas (and some not so simple ones--don't get carried away unless you have lots of time!)

Go stamp something!
Diane

Wednesday, August 28, 2013

Memory Jar

For my nephew's birthday I gave my sister in law this memory jar of her baby shower:
 

The label on the jar is made with the stamp set Baby Prints, Apothecary Accents Framelits and the new Pretty Print embossing folder.  I attached the label to the jar with sticky strip (nothing else would adhere to the smooth curved glass surface).  I made a small heart garland around the top using the small heart punch and strung them together with fishing line, which is tied to the hinge at the back of the jar.
 
 
The top of the jar is decorated with the adorable feet from the Baby Prints stamp set, the blue scallop circle is from the Perfect Pennants Bigz L die.
 
 
I printed off some wallet sized photos from the shower and used them to make a really simple accordion fold photo album which is made with two 12" strips of whisper white cardstock joined in the middle with a little bit of Designer Series Paper.  The photos are attached with all of our different Designer Washi Tapes.
 
 
One side of the album has the portrait photos, the other side has the landscape photos. 
 
 
At the shower, guests were asked to write notes to the mother-to-be.  The notes are inside these skinny envelopes.  These were placed inside the jar with the photos.
 
Do you have an event or memory that needs to be documented?  A memory jar is a fun way to keep that memory, and it's also less overwhelming than a traditional scrapbook can sometimes be.
 
Go stamp something!
Diane 


Wednesday, August 21, 2013

Stamp Club

The stamp club ladies have just gone home, and I thought you'd like to see what we made tonight:


A card with moving parts!  Pull the ribbon and...


Cute right!  The Garden Green layer is from the Peekaboo Frames die for the Big Shot, and the navy layer is attached with a little bit of washi tape.  We used three different stamp set on this card; the sentiment is from Yippee Skippy, the cake is made with Make a Cake and the speckles are Gorgeous Grunge.

Then we made this mini album:


It measures 3 x 6 and the inside pieces are each 2 x 5.  We decorated the front with the angled lines from Gorgeous Grunge in Crumb Cake, the little medallion is from Lacy & Lovely in Strawberry Slush, and the For You image is from Itty Bitty Banners in Midnight Muse, cut out with the coordinating framelits and the Big Shot Die-Cut Machine.  They're all stamped on Whisper White, mounted on Summer Starfruit, and the front and back covers are made with Confetti White Cardstock.
 
 
You could add tiny pictures, or make a cute coupon book, or journal things you're grateful for...so many options!  That great ribbon is Summer Starfruit 3/8" stitched satin ribbon, and it's tied on with linen thread.  The inside pockets are made with a 8 1/2 x 10 1/2 sheet of vellum cardstock.  Since Vellum is transparent we used glue dots to put our mini scrapbook together, since adhesive does show through, this is the tidiest option.  What would you put into this little beauty?

Go stamp something!
Diane

Tuesday, August 20, 2013

Treasure Hunt!

Fall 2013 Treasure Hunt!


Late Night Stampers is having a treasure hunt!  Enter to win great prizes...Stampin' Up! Merchandise!
Here’s how to play:

1. Go to the page titled ‘LNS Treasure Hunt-Participating Blogs' at the top of my blog

2. Visit each of the blogs listed (it’s always nice to leave a comment!) -look for the picture of the SU! box above, and find their clue

3. Make a note of what the clue is, and the blog you found it on

4. Once you’ve collected all 50 clues, email them to ME at teachtostamp@gmail.com listing each clue & where you found it.  Be sure to include your full name, email address, and blog address, if you have one.

5. You have from Tuesday August 20th to Friday, October 25th 2013 to collect 50 clues and email them to me, to be entered into the contest -Contest closes Friday Oct. 25th at midnight PST

My clue is:


Big Shot Storage Boxes!


Large Die BoxMedium Die BoxSmall Die Box
The Big Shot Storage Boxes come in three sizes, Large, Medium and Small (click on photos for more information).  Each box comes with an insert perfectly sized to hold Big Shot Dies, but you're not limited to using them for dies!

 
Large Storage Boxes
 
 
Medium Storage Box                    Small Storage Box

 I hold all my classes in my living room and dining room, so I like my stamping supplies to be somewhat hidden for when we use that area for entertaining,  These boxes are perfect for that!  I do have dies in most of my boxes, but I also use one of the small boxes to hold all of my Stampin' Write Markers and Blender Pens, and they all fit in there! 

 
Small Storage Box
 
 
Here are the boxes in my storage unit in my living room.  Not bad lookin' right?

I'm considering getting a couple more boxes to hold odds and ends that can sometimes look messy when not contained, such as adhesives and embellishments like our Pearls and Rhinestones.  I'm in the middle of a big clean and purge, so I'll decide what I need once that's done!  How do you keep your stamping supplies corralled and under control?

Go stamp something!
Diane

Friday, August 16, 2013

Friendly Friday

Hi Stampers!

Today I want to introduce you to my friend, Amanda Frankel, from Our Crafty Playdate.  Here's a card she posted earlier this week:
 
 
I just love the classy simple feel of this card!  The colour combination of Smokey Slate, Basic Grey, Daffodil Delight and Crushed Curry, the embossed background and that one coloured flower from the new Flower Shop stamp set  punched out and popped up so it hovers above the two black and white flowers.  Gorgeous!  And water colouring always makes a stamper feel like an artist!  Click on the picture to see more details in Amanda's blog post.  Leave her a comment, comments make bloggers happy!
 
Go stamp something!
Diane


Wednesday, July 24, 2013

Stamp Club Class

Hi Stampers,

It was stamp club night tonight!  While everyone was catching up, the ladies enjoyed looking through all of my loot from Convention.  New stamping products always get everyone excited!  Some people started thinking and planning, and taking pictures of ideas for Christmas projects, since many of my new goodies are from the upcoming Christmas catalogue which will go live August 1st.

Then it was time to get stamping!  Since we spent a lot of time looking through swaps, make and take projects and new products, we made two clean and simple cards tonight.  The first card was one of the cards I made to swap at Convention:


This card uses the Betsy's Blossom stamp set.  The blossom is stamped in Strawberry Slush and the stem is stamped in Pistachio Pudding.   The sentiment, from Itty Bitty Banners, is stamped in Early Espresso and cut out on the Big Shot using the Bitty Banners Framelits.

The second card we made is a CASE of a card I received while swapping at convention from Katie Brandt of St. Remy, New York.  We changed the colours to use the new in-colors and we used a different sentiment:


Sorry this picture is so huge, I don't know how to edit it here, though I did figure out how to make this text smaller!

This card uses a 1/4" strip of each of the five new in-colors: Pistachio Pudding, Strawberry Slush, Crisp Cantaloupe, Baked Brown Sugar and Coastal Cabana, all glued onto a piece of Whisper White.  Next we punched out a 1 3/4" circle of Whisper White and glued it onto a Basic Gray 2 3/8" Scallop circle and punched an Elegant Butterfly out of the centre.  Then we mounted the scallop circle over the stripes ensuring that all of the colours showed through the butterfly window.  Finally we inked up our greeting of choice, Itty Bitty Banners again and cut it out with our Bitty Banners Framelits and the Big Shot.  Thanks for the great layout, Katie!

Everyone's cards turned out great, and Alessandra's son even decided he wanted to give one of them to his girlfriend!  (He's going into Grade Two or Three, so cute!)

Thanks for coming out to stamp with me girls!  It was fun, even though some of the crew couldn't join us since they're off having fun in the sun.  Until next time...

Go stamp something!
Diane