Showing posts with label DSP. Show all posts

Saturday, March 29, 2014

Stamp Club


This month for stamp club we tried something a bit different. We used a template created by Angie Kennedy Juda to make five projects from one sheet of 12 x 12 Designer Series Paper. Here are the five projects we made:
 

This is the cutting template that Angie came up with:
 

Each stamp club member chose a different sheet of Sweet Sorbet DSP and cut it according to the template above and then scored the 3D projects. In addition to the designer paper we used card stock in Crisp Cantelope, Pistaccio Pudding, Pool Party and Summer Starfruit. We used ink pads in the same colours. 
 
Project #1  Treat Bag


For this project we also used a bit of ribbon and linen thread to hold the bag closed at the top. The sentiment is from the stamp set Perfect Pennants. The layers were cut with the Banners Framelits.  The photo on the right is the scoring guide for this treat bag.

Project #2  Pizza Box

 
The pizza box is topped with a cupcake made using the Cupcake Punch layered onto a Pool Party circle and Pistachio Pudding scallop circle.  In the photo on the right the dashed lines show where to score, the solid lines show where to cut.
 
Project #3  Tiny Triangle Box
 

We stamped a flower image from Petite Petals and punched it out with the coordinating punch.  The flower is layered onto a Pistachio Pudding circle and Pool Party scallop circle.  The box is tied shut with a bit of ribbon through tiny holes we punched in the top. 

Project #4  Thank You Card


This card uses the three thin strips of DSP.  We  cut a notch out of each end, and adhered them to the front, and folded over to the inside of the card.  For the focal image we stamped the smaller flower image from So Very Grateful and coloured it in with blender pens and ink from our ink pads. If you've never tried this before all you do is press the centre of your ink pad when it is closed, some of the ink will be transferred to the lid. Pick up the ink from the lid with your blender pen like it's a paint palette. We cut the image out with the Circle Framelits and layered it onto a punched out Crisp Cantaloupe scallop circle, and a Pool Party banner.

Project #5  Make a Wish Card


We used the 2" x 5 1/2" piece of DSP on this last project.  We stamped make a wish from Perfect Pennants in Pool Party and cut out all of the layers with the Banner Framelits.  The final embellishment were a bit of Pool Party Ruffled Ribbon attached with a Silver Brad, and an Itty Bitty punched flower in Summer Starfruit with a Rhinestone centre.

This class was a bit more involved than our typical stamp club class, but I just love the versatility of a concept like this one sheet wonder as it can be used with any designer paper you may have and whatever stamp sets suit the occasion you are making the projects for.  This also gives you great value for your Designer Paper!  The five projects can also be used individually, simply use the size of paper indicated in the template for the project you'd like to make and follow the scoring guide.

Go stamp something!
Diane


Tuesday, November 5, 2013

Stamping 101


Hi Stampers!

Tonight was Stamping 101!  We started with one sketch two ways, and no tools other than a paper cutter:

 
Yikes that's an off centre picture!  Sorry about that, but the card is still cute.  It uses Crisp Cantaloupe and Strawberry Slush card stock , the Happy Day stamp set and a little Daffodil Delight ribbon.  The Medallion image is stamped repeatedly in Crisp Cantaloupe to create the look of designer paper, then the greeting, happy day, is stamped in Strawberry Slush.  This stamp set comes with three other sentiments and any of them would look great on this card.
 
Simple sketch take two:
 

Same layout with a single bold image, Christmas Star stamped in Smoky Slate and the sentiment in Night of Navy.   A large Rhinestone is added to the centre for sparkle.

Our last project is not quite as simple, this one used a few tools and is totally worth the extra effort:
 

Love it!  It's a Chapstick or lipstick box!  Super cute right?  Everyone needs one of these in their stocking this Christmas!  It's made with a small pool party box (click here for dimensions) and two dresses cut from the Winter Frost Designer Series Paper Stack using a dress from the Dress Up Framelits and the Big Shot.  We decorated with a small length of Pool Party Ruffled Ribbon and a large Rhinestone.  Scoring the card stock for the box takes a few minutes, but once that's done it's a snap.  This project just makes me happy!
 
Go stamp something!
Diane


Wednesday, October 30, 2013

Altered Designer Series Paper

Hi Stampers!

I saw this card online by Karen Day and immediately knew I wanted to make a version of it:


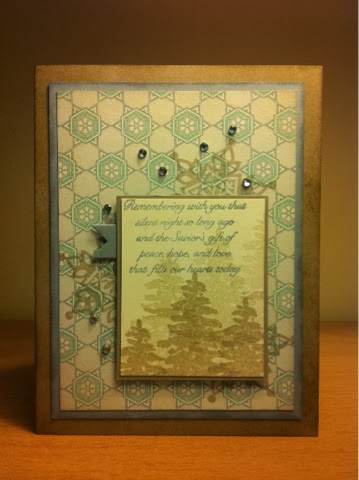
At first I thought it was made with Stampin' Up! products, but upon closer inspection I realized it wasn't, but was still inspired to make something like it. Here's my ,less professionally photographed, card:


I used Festive Flurry and Evergreen stamp sets, Crumb Cake and Smoky Slate card stock and ink. I did use Winter Frost DSP, but it was too crisp and white for this card, so I sponged it all over with Very Vanilla ink:
 

In this picture you can kind of see how the sponged DSP has a softer more vintage feel to it. For a finishing touch a added some tiny Rhinestones for a little Christmas sparkle :)

Go stamp something!
Diane


Wednesday, October 2, 2013

Stamping 101

Hi Stampers!

So the whole concept behind Stamping 101 is that we use simple techniques to create projects that are cute or beautiful, but that don't require too many products or a lot of time. Last night I think we really met that goal. We made 3 projects and were done in 45 minutes!


Our first project was this Trick or Treat card. This card was simple, and didn't take too long, but we did use a fair amount of product.  We used the retired spider web embossing folder on Basic Grey card stock, then ran the Silver Encore Pad really lightly over the raised web design. A little strip of each design from the  Witches Brew Designer Washi Tape add some colour and interest. Finally, we stamped the Trick or Treat image from Tags 4 You on Very Vanilla, punched it out with the Bracket Label Punch and attached it with a Stampin' Dimensional


Next up, a card with no layers, no Big Shot, no punches. This card uses the magic of two-step stamping!  This card was simple and we didn't need a lot of products, but it took a little bit longer to stamp.  We started by stamping the different leaves from Gently Falling; each in a different colour onto Baked Brown Sugar card stock. We used Cajun Craze, Daffodil Delight, Pumpkin Pie, Pear Pizzaz, and Crumb Cake ink.

Gently Falling Clear-Mount Stamp SetTags 4 You Wood-mount Stamp Set

Next we stamped the coordinating outline images over the coloured images, all using Baked Brown Sugar ink. Then we sponged the edges with a little Soft Suede ink. Finally, we stamped the Sentiment with VersaMark ink, and sprinkled on some Gold Embossing Powder which we melted with the Heat Tool. I took about 20 pictures of this card, but none were able to capture the way it looks in real life. The gold really stands out against the muted autumn colours. 


Then we used up some retired DSP to make this adorable, I mean spooky, Halloween treat holder.  This project only requires a few products, was simple and really fast.  We used the amazing Envelope Punch Board and the measurements for a gift card holder to make these, which means you only need a 5x5 piece of paper!  We added a little ribbon and that same image from Tags 4 You.  Slide in a Halloween candy bar and we're done!  Five minute project. Love that!  These could easily be made for any holiday or occasion.  It even looks cute with just the little bit of ribbon and nothing else.

Sometimes it's good to get back to stamping basics and create projects that remind you of what attracted you to paper crafting in the first place. What is your favorite simple technique?  

Go stamp something!
Diane

Wednesday, September 25, 2013

Epic Lacy & Lovely

Hi Stampers!

I saw this great card made with an interesting fold on Dawn Griffith's blog and just had to make one:


Dawn made a Halloween card, but I followed her instructions using Epic Day DSP and the Lacy & Lovely stamp set to make an everyday card instead. 
 

I love the way this card showcases both sides of the gorgeous DSP!  Choosing the card stock and ink colours was a no brainer since I just used colours that are in the DSP, which are listed on the back of the package as well as in the catalogue.
 

I also love that I had this card made in less than ten minutes using scraps of card stock and designer paper, and it's beautiful on the inside too!  I was going to stamp either the Miss you or Thank you image from Lacy & Lovely on the inside, but  I haven't decided who I'm giving this too yet, so I guess I'll wait and add that when I know what I'm using this card for.  Do you have some scraps and ten minutes?
 
Go stamp something!
Diane


Saturday, September 14, 2013

Friendly Friday

Hi Stampers!

I know it's Saturday.  I was worn out after my first full week at school with the students, and even though I knew exactly what I wanted to post, I just couldn't drag myself off the couch!  I am super excited about the new Envelope Punch Board, so today I am sharing some videos by Patty Bennett at Patty's Stamping Spot.

Envelope-punch-board-samples

I chose Patty's videos, because she not only shows you how easy it is to make these envelopes with the punch board, but also some super cute file folder cards:

Envelope-punch-board-file-folder-cards

Click on the photos to go to Patty's blog posts and view her videos.  I can't wait to use the punch board to shrink down my pile of retired designer series papers!  We'll be trying out this tool at Stamp Club Class this Wednesday.  Would you like to join us?  Email me to get more information about Stamp Club.

Go stamp something!
Diane

Monday, July 29, 2013

Shower Gift: Mini Scrapbook

Hi Stampers,

A friend of mine is getting married in the fall, and there was a bridal shower for her last weekend.  She is always snapping pictures, so I thought a mini scrapbook would be perfect for her.  I remembered a fellow Stampin' Up! demonstrator, Maggie Patterson of I Love Papercrafts, had posted a tutorial for a mini album for our new wood mount stamp cases not too long ago, so I followed her concept and measurements to create a gift for my friend. 


I decided to use a retired designer series paper because I felt the colours and design would suit both my friend and the occasion, I find this paper has a bit of a fairy tale feel to it which I think works well for a bridal feeling.  The sentiment on the front is from the stamp set Label Love, and yes, it has a coordinating punch.  Love that!


Inside I cut all the papers to Maggie's specifications to create the structure, but I decorated a bit more since I was giving this as a gift, and I didn't want it to look too empty without photos and journaling.  This sentiment is from the Yippee-Skippee! stamp set and cut out with the Labels Collection Framelits.  I applied Tombo Multi Mono Liquid Glue to the back of the DSP layer and let it dry.  This makes the glue tacky, like a sticky note, so that she can remove it if she has a picture she'd rather have showing when she opens the case.


There is a lot of room in this scrapbook, 13 panels you can add photos, journaling, or mementos to.  There is also a small envelope in the front you can slip something special into.


On the back I added another sentiment from the Yippee-Skippee! stamp set Shelli gave to all of us at convention.  You've got to love free stamps!

My friend was pleased when she opened this up at the shower and said, "I love handmade things!"  I knew she would, as she made paper corsages and hand stamped name tags for each of us which also listed how we knew her.  For her own shower!  I know she'll put it to good use and fill it with wonderful memories.  Love you Gen!

Do you have an event coming up?  Your friends and family will appreciate that little bit of extra love that goes into something made by hand too.

Go stamp something!
Diane