Friday, August 30, 2013

Friendly Friday

Hi Stampers!

Today I want you to meet my friend Laura Haffke from It's a La Dee Dah Day!  She's a very talented stamper, here are a few of her recent posts you might want to check out:
 
You know I love the You're Amazing stamp set!  I normally use it with bright colours, but here Laura made a beautiful card using some deeper colours, making a card with a more grown up feel.
 
Aren't these Muslin Bags from the Holiday Catalogue great!?!  I have one sitting here I haven't done anything with.  Such a cute little pouch for any small surprise...
 
       
Laura also has some great ideas for altering the design from My Paper Pumpkin in a few different ways to end up with a variety of great cards.
 
I think this one is my favourite!  The Swallowtail stamp set can do no wrong.  It always looks great, and I just love all of the interesting details Laura added to her card.  From the background stamp to the sponged circles, and then the adorable banners.  It's got so many things to look at, but none of those details distract from the star of the show, that amazing butterfly!
 
Thanks for sharing Laura!  If you enjoyed Laura's projects, click on any of the pictures to visit her blog and be sure to leave her a comment while you're there.  Inspired now?
 
Go stamp something!
Diane


Wednesday, August 28, 2013

Memory Jar

For my nephew's birthday I gave my sister in law this memory jar of her baby shower:
 

The label on the jar is made with the stamp set Baby Prints, Apothecary Accents Framelits and the new Pretty Print embossing folder.  I attached the label to the jar with sticky strip (nothing else would adhere to the smooth curved glass surface).  I made a small heart garland around the top using the small heart punch and strung them together with fishing line, which is tied to the hinge at the back of the jar.
 
 
The top of the jar is decorated with the adorable feet from the Baby Prints stamp set, the blue scallop circle is from the Perfect Pennants Bigz L die.
 
 
I printed off some wallet sized photos from the shower and used them to make a really simple accordion fold photo album which is made with two 12" strips of whisper white cardstock joined in the middle with a little bit of Designer Series Paper.  The photos are attached with all of our different Designer Washi Tapes.
 
 
One side of the album has the portrait photos, the other side has the landscape photos. 
 
 
At the shower, guests were asked to write notes to the mother-to-be.  The notes are inside these skinny envelopes.  These were placed inside the jar with the photos.
 
Do you have an event or memory that needs to be documented?  A memory jar is a fun way to keep that memory, and it's also less overwhelming than a traditional scrapbook can sometimes be.
 
Go stamp something!
Diane 


Monday, August 26, 2013

Happy Birthday Noah!

It was my nephew's first birthday party on the weekend!  Of course I needed a fabulous card to mark the occasion. I loved a card from this post by Andrea Borries on snippetsbyandrea.blogspot.com, so I cased her basic design. I stepped it up just a little bit with some washi tape and the large splatter image from Gorgeous Grunge on the background.


Those tiny confetti circles can move around, because they're in a vellum pocket. A piece of vellum, and a piece of Very Vanilla cardstock taped together with Witches Brew Designer Washi Tape.  The adorable lizard image is from Tag It.  A bonus with this adorable stamp set, is that when you purchase it Stampin' Up! donates $3 to the Ronald McDonald House Charities!
Tag It
 
 
I needed the inside to be cute too, so I stamped the party lizard again and added a little ribbon to cover up an ink smudge under his feet. As I'm always telling the girls at stamp club, there are no mistakes in stamping, only opportunities for embellishment!

Go stamp something!
Diane

Friday, August 23, 2013

Friendly Friday and Treasure Hunt Update

Hi Stampers,

I'm having some technical difficulties with my Treasure Hunt Page right now.  I went into the page to add the names of some new blogs that have joined the hunt and every time I try to publish the changes I get the spinning wheel of death...so for now there is no page!  My clue is on my post titled treasure hunt, you can click on it in the post list to the right.  I tried to add the list of names here, but then I get the wheel of death again and I can't publish it.  Sorry!!  You can get the list of names on my friend Penny's site: http://pennytokensstampinspot.blogspot.com .  I'll keep trying!

While you're on Penny's blog, be sure to check out some amazing cards she's made using the new Label Card Thinlit Die:

Front
Inside
 
 
Front
 
Inside
 
Front
 
Inside
 
She's got a very detailed tutorial with the Tea Party card which shows you how to get an extra panel on the right of right card so that you have some space to be able to write a message, as well as all the steps for decorating that card.  Who do you know that would appreciate all the little extras that go into a card like this?
 
Go stamp something!
Diane
 

Wednesday, August 21, 2013

Stamp Club

The stamp club ladies have just gone home, and I thought you'd like to see what we made tonight:


A card with moving parts!  Pull the ribbon and...


Cute right!  The Garden Green layer is from the Peekaboo Frames die for the Big Shot, and the navy layer is attached with a little bit of washi tape.  We used three different stamp set on this card; the sentiment is from Yippee Skippy, the cake is made with Make a Cake and the speckles are Gorgeous Grunge.

Then we made this mini album:


It measures 3 x 6 and the inside pieces are each 2 x 5.  We decorated the front with the angled lines from Gorgeous Grunge in Crumb Cake, the little medallion is from Lacy & Lovely in Strawberry Slush, and the For You image is from Itty Bitty Banners in Midnight Muse, cut out with the coordinating framelits and the Big Shot Die-Cut Machine.  They're all stamped on Whisper White, mounted on Summer Starfruit, and the front and back covers are made with Confetti White Cardstock.
 
 
You could add tiny pictures, or make a cute coupon book, or journal things you're grateful for...so many options!  That great ribbon is Summer Starfruit 3/8" stitched satin ribbon, and it's tied on with linen thread.  The inside pockets are made with a 8 1/2 x 10 1/2 sheet of vellum cardstock.  Since Vellum is transparent we used glue dots to put our mini scrapbook together, since adhesive does show through, this is the tidiest option.  What would you put into this little beauty?

Go stamp something!
Diane

Tuesday, August 20, 2013

Treasure Hunt!

Fall 2013 Treasure Hunt!


Late Night Stampers is having a treasure hunt!  Enter to win great prizes...Stampin' Up! Merchandise!
Here’s how to play:

1. Go to the page titled ‘LNS Treasure Hunt-Participating Blogs' at the top of my blog

2. Visit each of the blogs listed (it’s always nice to leave a comment!) -look for the picture of the SU! box above, and find their clue

3. Make a note of what the clue is, and the blog you found it on

4. Once you’ve collected all 50 clues, email them to ME at teachtostamp@gmail.com listing each clue & where you found it.  Be sure to include your full name, email address, and blog address, if you have one.

5. You have from Tuesday August 20th to Friday, October 25th 2013 to collect 50 clues and email them to me, to be entered into the contest -Contest closes Friday Oct. 25th at midnight PST

My clue is:


Big Shot Storage Boxes!


Large Die BoxMedium Die BoxSmall Die Box
The Big Shot Storage Boxes come in three sizes, Large, Medium and Small (click on photos for more information).  Each box comes with an insert perfectly sized to hold Big Shot Dies, but you're not limited to using them for dies!

 
Large Storage Boxes
 
 
Medium Storage Box                    Small Storage Box

 I hold all my classes in my living room and dining room, so I like my stamping supplies to be somewhat hidden for when we use that area for entertaining,  These boxes are perfect for that!  I do have dies in most of my boxes, but I also use one of the small boxes to hold all of my Stampin' Write Markers and Blender Pens, and they all fit in there! 

 
Small Storage Box
 
 
Here are the boxes in my storage unit in my living room.  Not bad lookin' right?

I'm considering getting a couple more boxes to hold odds and ends that can sometimes look messy when not contained, such as adhesives and embellishments like our Pearls and Rhinestones.  I'm in the middle of a big clean and purge, so I'll decide what I need once that's done!  How do you keep your stamping supplies corralled and under control?

Go stamp something!
Diane

Monday, August 19, 2013

Single Stamps

Hi Stampers!
 
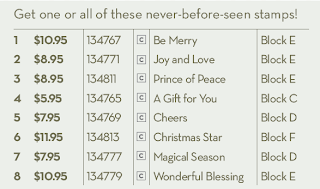
Stampin' Up! has come out with a new collection of single stamps!  These are great when you're looking for that one, just right image for your project.  Here they are:


Please note that single stamps are only available in clear mount, and they do not come with a clear mount block, the block listed next to each stamp is the one that is closest in size to the image.
 
I'm loving Christmas Star right now, you might be seeing that here in the a future post!  Which one is your favourite?
 
Go stamp something!
Diane

Friday, August 16, 2013

Friendly Friday

Hi Stampers!

Today I want to introduce you to my friend, Amanda Frankel, from Our Crafty Playdate.  Here's a card she posted earlier this week:
 
 
I just love the classy simple feel of this card!  The colour combination of Smokey Slate, Basic Grey, Daffodil Delight and Crushed Curry, the embossed background and that one coloured flower from the new Flower Shop stamp set  punched out and popped up so it hovers above the two black and white flowers.  Gorgeous!  And water colouring always makes a stamper feel like an artist!  Click on the picture to see more details in Amanda's blog post.  Leave her a comment, comments make bloggers happy!
 
Go stamp something!
Diane


Wednesday, August 14, 2013

Build a Banner Cards

Hi Stampers!

I was on Stampin' Connection the other day, our demonstrator sharing web site, and came across this great idea for using the stencils from the Build a Banner Simply Created Kit in card making:


The card I saw was a Christmas card, but I wanted to make monogrammed note cards. For this card I used the colours I already had out from making my welcome banner.  Here's another colour combination:
 

This time I wanted a colour combination that was classy and looked a bit more polished.

Then I got to thinking, we could use the background stencils the same way we use Designer Series Paper or embossing folders to add a layer of interest to our cards:


Cute right?  I just love finding out that I product I bought for one purpose is more versatile than I thought it was!  What do you have in your stash that you can use in a different way than you have before?

Go stamp something!
Diane