Showing posts with label Perfect Pennants. Show all posts

Saturday, March 29, 2014

Stamp Club


This month for stamp club we tried something a bit different. We used a template created by Angie Kennedy Juda to make five projects from one sheet of 12 x 12 Designer Series Paper. Here are the five projects we made:
 

This is the cutting template that Angie came up with:
 

Each stamp club member chose a different sheet of Sweet Sorbet DSP and cut it according to the template above and then scored the 3D projects. In addition to the designer paper we used card stock in Crisp Cantelope, Pistaccio Pudding, Pool Party and Summer Starfruit. We used ink pads in the same colours. 
 
Project #1  Treat Bag


For this project we also used a bit of ribbon and linen thread to hold the bag closed at the top. The sentiment is from the stamp set Perfect Pennants. The layers were cut with the Banners Framelits.  The photo on the right is the scoring guide for this treat bag.

Project #2  Pizza Box

 
The pizza box is topped with a cupcake made using the Cupcake Punch layered onto a Pool Party circle and Pistachio Pudding scallop circle.  In the photo on the right the dashed lines show where to score, the solid lines show where to cut.
 
Project #3  Tiny Triangle Box
 

We stamped a flower image from Petite Petals and punched it out with the coordinating punch.  The flower is layered onto a Pistachio Pudding circle and Pool Party scallop circle.  The box is tied shut with a bit of ribbon through tiny holes we punched in the top. 

Project #4  Thank You Card


This card uses the three thin strips of DSP.  We  cut a notch out of each end, and adhered them to the front, and folded over to the inside of the card.  For the focal image we stamped the smaller flower image from So Very Grateful and coloured it in with blender pens and ink from our ink pads. If you've never tried this before all you do is press the centre of your ink pad when it is closed, some of the ink will be transferred to the lid. Pick up the ink from the lid with your blender pen like it's a paint palette. We cut the image out with the Circle Framelits and layered it onto a punched out Crisp Cantaloupe scallop circle, and a Pool Party banner.

Project #5  Make a Wish Card


We used the 2" x 5 1/2" piece of DSP on this last project.  We stamped make a wish from Perfect Pennants in Pool Party and cut out all of the layers with the Banner Framelits.  The final embellishment were a bit of Pool Party Ruffled Ribbon attached with a Silver Brad, and an Itty Bitty punched flower in Summer Starfruit with a Rhinestone centre.

This class was a bit more involved than our typical stamp club class, but I just love the versatility of a concept like this one sheet wonder as it can be used with any designer paper you may have and whatever stamp sets suit the occasion you are making the projects for.  This also gives you great value for your Designer Paper!  The five projects can also be used individually, simply use the size of paper indicated in the template for the project you'd like to make and follow the scoring guide.

Go stamp something!
Diane


Wednesday, March 12, 2014

Stamping 101

Hi Stampers,

The first Tuesday of every month we have a Stamping 101 class where we make three projects that use simple techniques to produce quick, yet beautiful items. This month we made two cards and a treat holder. 


The first card used the Decorative Dots Textured Embossing Folder from the Saleabration brochure. The three stamps we used were all from different sets; the diagonal stripe image is from Gorgeous Grunge, the sentiment is from Create a Cupcake, and the flower and the coordinating punch are from the Petite Petals bundle. We used Very Vanilla and Strawberry Slush card stock and Early Espresso ink. 


The second card features the Designer Series Paper from Saleabration, Sweet Sorbet. The stamped image is from Perfect Pennants and we cut it out with the coordinating framelits and the Big Shot. The card stock layers are Crisp Cantelope and Pistacio Pudding. This was our fastest project, I think this card came together in about five minutes. 


Our last project was this Ghiradeli chocolate holder. We used the Envelope Punch Board to get the file tab shape at the top. The image on the front, from Apothecary Art, was stamped twice. The bottom layer was stamped in Coastal Cabana and cut out with the coordinating framelits, then it was stamped again in Wisteria Wonder from which we cut out the centre of the image with the circle framelits. We then used Stampin' Write markers in Daffodil Delight and Pear Pizzaz to colour the flowers and leaves. So cute!!

If you're interested in any of the Saleabration items they are available until March 31st. Contact me if you need a brochure. 

Go stamp something!
Diane

Wednesday, February 19, 2014

Stamp Club Mini Album

Hi Stampers!

At stamp club we usually make three projects, and each project focuses on a certain product or technique. Once in a while I like to do a larger scrapbook project instead. The scrapbooking members like to get some ideas for their memory keeping, and the card makers like to try something new and go home with a photo ready scrapbook project. 

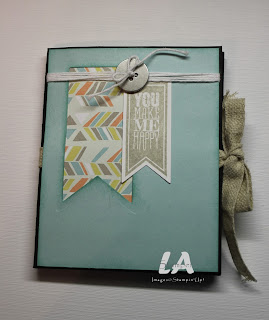
This month we're using a template I found on LA Stamper for a mini scrapbook using a 12x12 piece of card stock as the base. Here's her mini scrapbook, and the scoring and cutting template.  Click on the photo to see her post:

http://www.lastamper.blogspot.ca/2014/01/sale-bration-soup-stamps.html  
 
For our stamp club project I wanted to use the Sale-a-bration DSP, so that set the colour palette. I added Crumb Cake for the base, and Primrose Petals as an additional accent colour. 

 
For the cover we embossed a 3 1/2 x 4 1/2 piece of Pool Party card stock. (All panels are decorated with 3 1/2" x 4 1/2" layer)  Then we cut out a piece of Sweet Sorbet DSP with the Banners Framelits Dies and an image from the coordinating Perfect Pennants Stamp Set with the same framelits. Those two banners are attached to the Pool Party base with Retro Fresh Designer Washi Tape
 
 
When you open the cover, you reveal a pocket on the left and a photo panel on the right. The pocket has some Sweet Sorbet DSP attached, and the corners have been rounded. The photo panel has  a Summer Starfruit layer and two circles cut out with the Circle Framelits and glued only on the back and the edge near the fold so that a photo can be slipped underneath. The Pistachio Pudding circle is embellished with a flower from Banner Blast stamped in Primrose Petals. The Pool Party circle is stamped with an image from Perfect Pennants in Jet Black StazOn ink. 


When you open the Starfruit panel you reveal two photo/journaling panels. The Primrose Petals panel is embellished with an image from Petite Petals punched out with the coordinating Petite Petals Punch, and the hello from Perfect Pennants is stamped in Cantelope . The Crisp Cantelope panel is stamped with a diagonal striped banner image from Perfect Pennants in Primrose ink, the little banner and star are from Banner Blast and punched out with the Banner Punch, both free during Sale-a-bration!


When you flip those two panels down, you reveal the last four photo/journaling panels. Three more designs from the Sweet Sorbet DSP are used here, along with a piece of Pistachio Pudding. 

The flap over the top middle panel has an image from Perfect Pennants stamped in Pool Party and cut out with the coordinating Banners Framelits, mounted on a Summer Starfruit banner and a slim strip of Primrose card stock.  The flap over the right top panel was left plain, as I intend to mount a photo onto the flap, and a second photo underneath it on the DSP layer.

The bottom left panel simply has a strip of Crumb Cake card stock embossed with the Decorative Dots embossing folder, also free during Sale-a-bration. The bottom right panel has been stamped all over with the small splatter image from Gorgeous Grunge in Pustachio Pudding ink. Three different images from Banner Blast were stamped in Starfruit, Cantelope and Primrose, and punched out with the coordinating  Banner Punch, yes, both are free during Sale-a-bration.

Whew!  That was a lot of explanation for one project!  The truth is, once the paper is cut it comes together pretty quickly, the club stampers completed their scrapbooks in an hour. All that's left is to print out some pictures! 

If you'd like to get in on Sale-a-bration and have some of these free products to use in your paper crafting, contact me and I will get you a copy of the brochure. Can't wait?  Go to my Stampin' Up! website to view it online

Go stamp something!
Diane


Wednesday, August 28, 2013

Memory Jar

For my nephew's birthday I gave my sister in law this memory jar of her baby shower:
 

The label on the jar is made with the stamp set Baby Prints, Apothecary Accents Framelits and the new Pretty Print embossing folder.  I attached the label to the jar with sticky strip (nothing else would adhere to the smooth curved glass surface).  I made a small heart garland around the top using the small heart punch and strung them together with fishing line, which is tied to the hinge at the back of the jar.
 
 
The top of the jar is decorated with the adorable feet from the Baby Prints stamp set, the blue scallop circle is from the Perfect Pennants Bigz L die.
 
 
I printed off some wallet sized photos from the shower and used them to make a really simple accordion fold photo album which is made with two 12" strips of whisper white cardstock joined in the middle with a little bit of Designer Series Paper.  The photos are attached with all of our different Designer Washi Tapes.
 
 
One side of the album has the portrait photos, the other side has the landscape photos. 
 
 
At the shower, guests were asked to write notes to the mother-to-be.  The notes are inside these skinny envelopes.  These were placed inside the jar with the photos.
 
Do you have an event or memory that needs to be documented?  A memory jar is a fun way to keep that memory, and it's also less overwhelming than a traditional scrapbook can sometimes be.
 
Go stamp something!
Diane