Showing posts with label Punches. Show all posts

Thursday, May 29, 2014

2014-2016 In Colors

The new in colors will be available starting June 2nd, and I think you're going to like these colors!

This first project uses all five of the new colors:


The base of this card in Tangerine Tangelo, the stripes are Lost Lagoon, the greeting is Mossy Meadow, the paint splotch in the bottom corner is Hello Honey, and the heart is Blackberry Bliss. The 'painted' images are all from a new stamp set called Work of Art, and the greeting is from Yippee-Skippee!


This second card also uses the new stamp set Work of Art.  The streaks of paint are in Blackberry Bliss, Hello Honey and Lost Lagoon.  The splatters are in Melon Mombo, and the sentiment is in Black StaxOn. I just Love the simplicity of this card-- Whisper White card stock, a single stamp set and a few ink pads.  I have a feeling I"ll be making more of these.


This little bag uses a sheet of Designer Series Paper from the new 4 1/2 x 6 1/2 paper stack, Moonlight.  This design features Hello Honey and Blackberry Bliss. The closure on top is also Hello Honey using one of the tag topper punches. The tiny flower is punched with the Itty Bitty Punch Pack, the stamped flower is from Petite Petals, the greeting is from Label Love. All of these are in Blackberry Bliss. 

The DSP is scored along the long side at 1", 3", 4", and 6".  It is scored along the short side at 1". This bag comes together pretty easily. Here is a link to a video of Sam Donald that shows how to make it start to finish.  Her blog is full of wide variety of boxes and bags.  When I need a packaging idea that's where I look first.

I hope you've enjoyed this small taste of the 2014-2016 In-colours, there will be much more coming!

Go stamp something!
Diane


Monday, October 21, 2013

Merry Little Christmas

Hi Stampers!

Here's a different Christmas card using the stamp set, Merry Little Christmas from the simply created bundle:


I saw this on Pinterest and just had to make it!  It uses a standard Garden Green base, Season of Style DSP from the paper stack, Baked Brown Sugar, Early Espresso, Basic Black and Real Red card stock and the following punches: 
 
 
The antlers were made with a retired snowflake punch, and the greeting was stamped in Whisper White ink.  I started to draw the doodle lines with my white signo gel pen, but I guess I haven't used it in a while and I couldn't get the ink flowing, I'll have to see if I can rectify that.  For now I decided to use a silver stampin' dazzle marker as a substitute.  The other details were drawn in with an Early Espresso stampin' write marker.
 
This was a nice way to unwind after a busy day, and stamping is way cheaper than therapy!

Go stamp something!
Diane

Monday, October 14, 2013

Happy Thanksgiving!

My project today couldn't be much simpler:


Every year I make cranberry sauce for the kids teachers and my coworkers and family. This year with kids in two different schools I made 40 jars so the labels needed to be quick and easy. I simply stamped the leaf and outline images from Gently Falling onto Very Vanilla card stock and punched them out with the large tag punch. I wrote people's names with a gold Stampin' Dazzle marker, and if they needed to be signed (the ones dropped off at the high school) I mounted them on a 1-3/4 x 4 piece of Baked Brown Sugar folded in half. 

Happy Thanksgiving Canadian friends...
Go stamp something!
Diane

Monday, September 16, 2013

Envelope Punch Board Love

Hi Stampers!

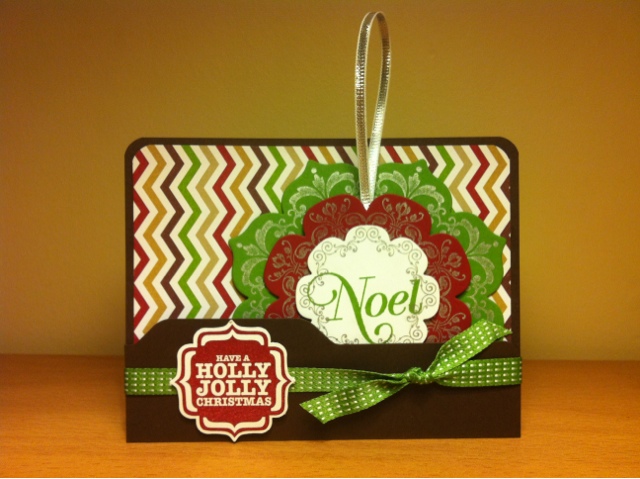
This punch board is the coolest new tool!  I've only had a couple of hours to play with it but I love it!!  Of course it makes beautiful, polished looking envelopes out of any type of paper you like, but you can also make boxes, scrapbooks, and cards with little tabs that look like file folders!  I followed Patty Bennett's tutorial (that I shared on Friendly Friday) and made this pocket card that holds a simple ornament:

 
The base is a 5-1/2 x 6 piece of Early Espresso cardstock, lined with DSP from the Season of Style Paperstack. Have a Holly Jolly Christmas from Tags 4 You is stamped in Cherry Cobbler and punched out with the Label Bracket Punch.  (you can get these in a bundle and save!)  That cute tab you see on the Early Espresso cardstock is made with one of the punches on the new amazing Envelope Punch Board!  Add it to your must have list now!!
 

The ornament is made with the Daydream Medallions stamp set inked with the Silver Metallic Encore Pad, stamped onto Gumball Green, Cherry Cobbler and Whisper White cardstock.  The layers are cut out with the Floral Frames Framelits Dies and the Big Shot. Noel is from Greetings of the Season and the hanger is made with some Silver 1/8" Ribbon from the Holiday Catalogue.  Doesn't it make you want to start preparing for the holidays?

Go stamp something!
Diane


Tuesday, September 3, 2013

Stamping 101

Hi Stampers!

Tonight was Stamping 101!  We made two cards, one all occasion and one Christmas:


We started with this Merry card in Cherry Cobbler.  We used the Expressions Thinlits Dies and the Big Shot to cut out the word Merry, and the Argyle Embossing Folder on the Cherry card stock. We finished off our card with a few little pieces of Season of Style Designer Series Paper.  Cute!

Expressions Thinlits Dies


Our second card uses the stamp sets Gorgeous Grunge and Yippee-Skippee!  The card base is pool party, and the next layer is Crisp Cantaloupe.  We used the same colours of ink along with Basic Gray, the 1-3/4" circle punch, 2-3/8 scallop circle punch and presto zesto, we had an all occasion card ready to go!  It only took about 30 minutes to complete both cards!

Deciding is the most time consuming part!  Choose a clean and simple design and see if you can find 30 minutes to craft. I found these ideas on Pinterest and adapted them slightly to suit the supplies I had on hand. It's a great place to find some simple ideas (and some not so simple ones--don't get carried away unless you have lots of time!)

Go stamp something!
Diane

Wednesday, August 28, 2013

Memory Jar

For my nephew's birthday I gave my sister in law this memory jar of her baby shower:
 

The label on the jar is made with the stamp set Baby Prints, Apothecary Accents Framelits and the new Pretty Print embossing folder.  I attached the label to the jar with sticky strip (nothing else would adhere to the smooth curved glass surface).  I made a small heart garland around the top using the small heart punch and strung them together with fishing line, which is tied to the hinge at the back of the jar.
 
 
The top of the jar is decorated with the adorable feet from the Baby Prints stamp set, the blue scallop circle is from the Perfect Pennants Bigz L die.
 
 
I printed off some wallet sized photos from the shower and used them to make a really simple accordion fold photo album which is made with two 12" strips of whisper white cardstock joined in the middle with a little bit of Designer Series Paper.  The photos are attached with all of our different Designer Washi Tapes.
 
 
One side of the album has the portrait photos, the other side has the landscape photos. 
 
 
At the shower, guests were asked to write notes to the mother-to-be.  The notes are inside these skinny envelopes.  These were placed inside the jar with the photos.
 
Do you have an event or memory that needs to be documented?  A memory jar is a fun way to keep that memory, and it's also less overwhelming than a traditional scrapbook can sometimes be.
 
Go stamp something!
Diane 


Friday, August 16, 2013

Friendly Friday

Hi Stampers!

Today I want to introduce you to my friend, Amanda Frankel, from Our Crafty Playdate.  Here's a card she posted earlier this week:
 
 
I just love the classy simple feel of this card!  The colour combination of Smokey Slate, Basic Grey, Daffodil Delight and Crushed Curry, the embossed background and that one coloured flower from the new Flower Shop stamp set  punched out and popped up so it hovers above the two black and white flowers.  Gorgeous!  And water colouring always makes a stamper feel like an artist!  Click on the picture to see more details in Amanda's blog post.  Leave her a comment, comments make bloggers happy!
 
Go stamp something!
Diane


Monday, August 5, 2013

You're Amazing!

Hi Stampers,

Yesterday we had a first birthday party to go to.  Of course the first thing I start thinking about is what kind of card I'm going to make!  I flipped though my stamp sets and settled on You're
Amazing.
You're Amazing Clear-Mount Stamp Set
I didn't think I would use this set very much when I got it, how often do I need a circus themed card or scrapbook page?  I've actually used it a lot--in a non-circus kind of way.  The You're Amazing and Happy Birthday sentiments have come in really handy when I want the words to take centre stage in my project, they're nice and bold and look great stamped in a vibrant colour.  The hot air balloon actually makes a nice soft background image when stamped in a subtle colour or used tone on tone.  The tickets have a coordinating punch, love that!  The image I haven't really used much is the elephant, until now...


He is so cute in his party hat!  Since I was making a first birthday card, I decided to go with bright colours: Pacific Point, Real Red and Pumpkin Pie.  I used four of the images from You're Amazing, and two images from That's the Ticket, and at the last minute I added the lines in the background from Gorgeous Grunge.  I just felt like the background needed something.  Since I didn't have a DSP to coordinate with my colour combination, I made my own using the hot air balloon image and the tiny ticket image and the three colours of ink on a 1 1/4" strip of Whisper White card stock.  I used one of the Apothecary Accents Framelits Dies to cut out Happy Birthday and a couple of punches for the adorable party elephant.  Two mini brads and a few dimensionals later, here we are, a cute birthday card!
 
I think since he's one he won't care what his card looks like, but I love it, and I think his mom will too.  Happy Birthday Luke!!  Think about what events you have coming up and...
 
Go stamp something!
Diane

Monday, July 29, 2013

Shower Gift: Mini Scrapbook

Hi Stampers,

A friend of mine is getting married in the fall, and there was a bridal shower for her last weekend.  She is always snapping pictures, so I thought a mini scrapbook would be perfect for her.  I remembered a fellow Stampin' Up! demonstrator, Maggie Patterson of I Love Papercrafts, had posted a tutorial for a mini album for our new wood mount stamp cases not too long ago, so I followed her concept and measurements to create a gift for my friend. 


I decided to use a retired designer series paper because I felt the colours and design would suit both my friend and the occasion, I find this paper has a bit of a fairy tale feel to it which I think works well for a bridal feeling.  The sentiment on the front is from the stamp set Label Love, and yes, it has a coordinating punch.  Love that!


Inside I cut all the papers to Maggie's specifications to create the structure, but I decorated a bit more since I was giving this as a gift, and I didn't want it to look too empty without photos and journaling.  This sentiment is from the Yippee-Skippee! stamp set and cut out with the Labels Collection Framelits.  I applied Tombo Multi Mono Liquid Glue to the back of the DSP layer and let it dry.  This makes the glue tacky, like a sticky note, so that she can remove it if she has a picture she'd rather have showing when she opens the case.


There is a lot of room in this scrapbook, 13 panels you can add photos, journaling, or mementos to.  There is also a small envelope in the front you can slip something special into.


On the back I added another sentiment from the Yippee-Skippee! stamp set Shelli gave to all of us at convention.  You've got to love free stamps!

My friend was pleased when she opened this up at the shower and said, "I love handmade things!"  I knew she would, as she made paper corsages and hand stamped name tags for each of us which also listed how we knew her.  For her own shower!  I know she'll put it to good use and fill it with wonderful memories.  Love you Gen!

Do you have an event coming up?  Your friends and family will appreciate that little bit of extra love that goes into something made by hand too.

Go stamp something!
Diane

Wednesday, July 24, 2013

Stamp Club Class

Hi Stampers,

It was stamp club night tonight!  While everyone was catching up, the ladies enjoyed looking through all of my loot from Convention.  New stamping products always get everyone excited!  Some people started thinking and planning, and taking pictures of ideas for Christmas projects, since many of my new goodies are from the upcoming Christmas catalogue which will go live August 1st.

Then it was time to get stamping!  Since we spent a lot of time looking through swaps, make and take projects and new products, we made two clean and simple cards tonight.  The first card was one of the cards I made to swap at Convention:


This card uses the Betsy's Blossom stamp set.  The blossom is stamped in Strawberry Slush and the stem is stamped in Pistachio Pudding.   The sentiment, from Itty Bitty Banners, is stamped in Early Espresso and cut out on the Big Shot using the Bitty Banners Framelits.

The second card we made is a CASE of a card I received while swapping at convention from Katie Brandt of St. Remy, New York.  We changed the colours to use the new in-colors and we used a different sentiment:


Sorry this picture is so huge, I don't know how to edit it here, though I did figure out how to make this text smaller!

This card uses a 1/4" strip of each of the five new in-colors: Pistachio Pudding, Strawberry Slush, Crisp Cantaloupe, Baked Brown Sugar and Coastal Cabana, all glued onto a piece of Whisper White.  Next we punched out a 1 3/4" circle of Whisper White and glued it onto a Basic Gray 2 3/8" Scallop circle and punched an Elegant Butterfly out of the centre.  Then we mounted the scallop circle over the stripes ensuring that all of the colours showed through the butterfly window.  Finally we inked up our greeting of choice, Itty Bitty Banners again and cut it out with our Bitty Banners Framelits and the Big Shot.  Thanks for the great layout, Katie!

Everyone's cards turned out great, and Alessandra's son even decided he wanted to give one of them to his girlfriend!  (He's going into Grade Two or Three, so cute!)

Thanks for coming out to stamp with me girls!  It was fun, even though some of the crew couldn't join us since they're off having fun in the sun.  Until next time...

Go stamp something!
Diane