Showing posts with label Petite Petals. Show all posts

Thursday, May 29, 2014

2014-2016 In Colors

The new in colors will be available starting June 2nd, and I think you're going to like these colors!

This first project uses all five of the new colors:


The base of this card in Tangerine Tangelo, the stripes are Lost Lagoon, the greeting is Mossy Meadow, the paint splotch in the bottom corner is Hello Honey, and the heart is Blackberry Bliss. The 'painted' images are all from a new stamp set called Work of Art, and the greeting is from Yippee-Skippee!


This second card also uses the new stamp set Work of Art.  The streaks of paint are in Blackberry Bliss, Hello Honey and Lost Lagoon.  The splatters are in Melon Mombo, and the sentiment is in Black StaxOn. I just Love the simplicity of this card-- Whisper White card stock, a single stamp set and a few ink pads.  I have a feeling I"ll be making more of these.


This little bag uses a sheet of Designer Series Paper from the new 4 1/2 x 6 1/2 paper stack, Moonlight.  This design features Hello Honey and Blackberry Bliss. The closure on top is also Hello Honey using one of the tag topper punches. The tiny flower is punched with the Itty Bitty Punch Pack, the stamped flower is from Petite Petals, the greeting is from Label Love. All of these are in Blackberry Bliss. 

The DSP is scored along the long side at 1", 3", 4", and 6".  It is scored along the short side at 1". This bag comes together pretty easily. Here is a link to a video of Sam Donald that shows how to make it start to finish.  Her blog is full of wide variety of boxes and bags.  When I need a packaging idea that's where I look first.

I hope you've enjoyed this small taste of the 2014-2016 In-colours, there will be much more coming!

Go stamp something!
Diane


Tuesday, May 13, 2014

Stamp Club

Hi Stampers,

I'm a bit behind schedule here on the blog, but I wanted to make sure to share these projects with you.
First up, a neutral card using one of our Hostess Sets, Postage Collection.  The neutral colour combination, Crumb Cake and Very Vanilla, ended up giving this card an old fashion kind of feel:


Our second project is a colourful shaped card using our Floral Frames Collection framelits.  Cute and fun!!  This card uses the Flower Shop stamp set as well as a greeting from the  Itty Bitty Banners stamp set.


Here's a stepped up version. On this card I embossed each of the layers before adhering them.  I used a variety of embossing folders, in fact almost any of our embossing folders could work.


Lastly, our 3D project,


Just in time for Easter we used the Angled Tag Topper Punch and the Oval Designer Frame Embossing Folder combined with the Extra Large Oval Punch to make the window for this chocolate easter egg holder.  We tied it together with a little stitched ribbon and a couple of flowers from Petite Petals in colours that coordinated with our chocolate egg wrapper.

Stay tuned, in the next few days I'll be posting some projects using sneak peak products from the upcoming 2014-2015 catalogue which will be released in June...some great things are coming!

Go stamp something!
 

Wednesday, March 12, 2014

Stamping 101

Hi Stampers,

The first Tuesday of every month we have a Stamping 101 class where we make three projects that use simple techniques to produce quick, yet beautiful items. This month we made two cards and a treat holder. 


The first card used the Decorative Dots Textured Embossing Folder from the Saleabration brochure. The three stamps we used were all from different sets; the diagonal stripe image is from Gorgeous Grunge, the sentiment is from Create a Cupcake, and the flower and the coordinating punch are from the Petite Petals bundle. We used Very Vanilla and Strawberry Slush card stock and Early Espresso ink. 


The second card features the Designer Series Paper from Saleabration, Sweet Sorbet. The stamped image is from Perfect Pennants and we cut it out with the coordinating framelits and the Big Shot. The card stock layers are Crisp Cantelope and Pistacio Pudding. This was our fastest project, I think this card came together in about five minutes. 


Our last project was this Ghiradeli chocolate holder. We used the Envelope Punch Board to get the file tab shape at the top. The image on the front, from Apothecary Art, was stamped twice. The bottom layer was stamped in Coastal Cabana and cut out with the coordinating framelits, then it was stamped again in Wisteria Wonder from which we cut out the centre of the image with the circle framelits. We then used Stampin' Write markers in Daffodil Delight and Pear Pizzaz to colour the flowers and leaves. So cute!!

If you're interested in any of the Saleabration items they are available until March 31st. Contact me if you need a brochure. 

Go stamp something!
Diane

Wednesday, February 19, 2014

Stamp Club Mini Album

Hi Stampers!

At stamp club we usually make three projects, and each project focuses on a certain product or technique. Once in a while I like to do a larger scrapbook project instead. The scrapbooking members like to get some ideas for their memory keeping, and the card makers like to try something new and go home with a photo ready scrapbook project. 

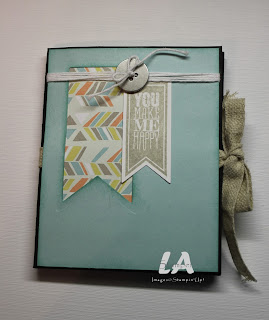
This month we're using a template I found on LA Stamper for a mini scrapbook using a 12x12 piece of card stock as the base. Here's her mini scrapbook, and the scoring and cutting template.  Click on the photo to see her post:

http://www.lastamper.blogspot.ca/2014/01/sale-bration-soup-stamps.html  
 
For our stamp club project I wanted to use the Sale-a-bration DSP, so that set the colour palette. I added Crumb Cake for the base, and Primrose Petals as an additional accent colour. 

 
For the cover we embossed a 3 1/2 x 4 1/2 piece of Pool Party card stock. (All panels are decorated with 3 1/2" x 4 1/2" layer)  Then we cut out a piece of Sweet Sorbet DSP with the Banners Framelits Dies and an image from the coordinating Perfect Pennants Stamp Set with the same framelits. Those two banners are attached to the Pool Party base with Retro Fresh Designer Washi Tape
 
 
When you open the cover, you reveal a pocket on the left and a photo panel on the right. The pocket has some Sweet Sorbet DSP attached, and the corners have been rounded. The photo panel has  a Summer Starfruit layer and two circles cut out with the Circle Framelits and glued only on the back and the edge near the fold so that a photo can be slipped underneath. The Pistachio Pudding circle is embellished with a flower from Banner Blast stamped in Primrose Petals. The Pool Party circle is stamped with an image from Perfect Pennants in Jet Black StazOn ink. 


When you open the Starfruit panel you reveal two photo/journaling panels. The Primrose Petals panel is embellished with an image from Petite Petals punched out with the coordinating Petite Petals Punch, and the hello from Perfect Pennants is stamped in Cantelope . The Crisp Cantelope panel is stamped with a diagonal striped banner image from Perfect Pennants in Primrose ink, the little banner and star are from Banner Blast and punched out with the Banner Punch, both free during Sale-a-bration!


When you flip those two panels down, you reveal the last four photo/journaling panels. Three more designs from the Sweet Sorbet DSP are used here, along with a piece of Pistachio Pudding. 

The flap over the top middle panel has an image from Perfect Pennants stamped in Pool Party and cut out with the coordinating Banners Framelits, mounted on a Summer Starfruit banner and a slim strip of Primrose card stock.  The flap over the right top panel was left plain, as I intend to mount a photo onto the flap, and a second photo underneath it on the DSP layer.

The bottom left panel simply has a strip of Crumb Cake card stock embossed with the Decorative Dots embossing folder, also free during Sale-a-bration. The bottom right panel has been stamped all over with the small splatter image from Gorgeous Grunge in Pustachio Pudding ink. Three different images from Banner Blast were stamped in Starfruit, Cantelope and Primrose, and punched out with the coordinating  Banner Punch, yes, both are free during Sale-a-bration.

Whew!  That was a lot of explanation for one project!  The truth is, once the paper is cut it comes together pretty quickly, the club stampers completed their scrapbooks in an hour. All that's left is to print out some pictures! 

If you'd like to get in on Sale-a-bration and have some of these free products to use in your paper crafting, contact me and I will get you a copy of the brochure. Can't wait?  Go to my Stampin' Up! website to view it online

Go stamp something!
Diane