Showing posts with label Envelope Punch Board. Show all posts

Wednesday, March 12, 2014

Stamping 101

Hi Stampers,

The first Tuesday of every month we have a Stamping 101 class where we make three projects that use simple techniques to produce quick, yet beautiful items. This month we made two cards and a treat holder. 


The first card used the Decorative Dots Textured Embossing Folder from the Saleabration brochure. The three stamps we used were all from different sets; the diagonal stripe image is from Gorgeous Grunge, the sentiment is from Create a Cupcake, and the flower and the coordinating punch are from the Petite Petals bundle. We used Very Vanilla and Strawberry Slush card stock and Early Espresso ink. 


The second card features the Designer Series Paper from Saleabration, Sweet Sorbet. The stamped image is from Perfect Pennants and we cut it out with the coordinating framelits and the Big Shot. The card stock layers are Crisp Cantelope and Pistacio Pudding. This was our fastest project, I think this card came together in about five minutes. 


Our last project was this Ghiradeli chocolate holder. We used the Envelope Punch Board to get the file tab shape at the top. The image on the front, from Apothecary Art, was stamped twice. The bottom layer was stamped in Coastal Cabana and cut out with the coordinating framelits, then it was stamped again in Wisteria Wonder from which we cut out the centre of the image with the circle framelits. We then used Stampin' Write markers in Daffodil Delight and Pear Pizzaz to colour the flowers and leaves. So cute!!

If you're interested in any of the Saleabration items they are available until March 31st. Contact me if you need a brochure. 

Go stamp something!
Diane

Monday, October 28, 2013

Card in a Box

Hi Stampers!

So I just had to try the card in the box I posted a link to on Friendly Friday, and I love it!  Here's how mine turned out:

 
I used Crumb Cake cardstock for the base, Season of Style Designer Series Paper, the Festive Flurry stamp set and coordinating framelits, a little Cherry Cobbler 1" Grosgrain Ribbon and the sentiment is from Joyful Christmas.  On the video all of the measurements are in centimetres, but our Stampin' Up! paper cutters have all of the measurements in both centimetres and inches, so that was no problem.  Our paper is half an inch shorter, so using her measurements there is no tab.  Instead I used a piece of scrap glued to both edges on the inside to hold the box together.  Here's a view from of the side:
 

Do you love it too?  It takes a bit longer than the cards I usually post, but the extra time certainly pays off when someone opens it and all those flaps pop open!  When this card is flat it is larger than a standard card, so I used my Envelope Punch Board to make a 6" x 6 1/2" envelope with Crumb Cake card stock. 


This was a very satisfying way to pass an afternoon, I recommend giving it a try when you have a little time for stamping set aside. 

Go stamp something!
Diane


Wednesday, October 2, 2013

Stamping 101

Hi Stampers!

So the whole concept behind Stamping 101 is that we use simple techniques to create projects that are cute or beautiful, but that don't require too many products or a lot of time. Last night I think we really met that goal. We made 3 projects and were done in 45 minutes!


Our first project was this Trick or Treat card. This card was simple, and didn't take too long, but we did use a fair amount of product.  We used the retired spider web embossing folder on Basic Grey card stock, then ran the Silver Encore Pad really lightly over the raised web design. A little strip of each design from the  Witches Brew Designer Washi Tape add some colour and interest. Finally, we stamped the Trick or Treat image from Tags 4 You on Very Vanilla, punched it out with the Bracket Label Punch and attached it with a Stampin' Dimensional


Next up, a card with no layers, no Big Shot, no punches. This card uses the magic of two-step stamping!  This card was simple and we didn't need a lot of products, but it took a little bit longer to stamp.  We started by stamping the different leaves from Gently Falling; each in a different colour onto Baked Brown Sugar card stock. We used Cajun Craze, Daffodil Delight, Pumpkin Pie, Pear Pizzaz, and Crumb Cake ink.

Gently Falling Clear-Mount Stamp SetTags 4 You Wood-mount Stamp Set

Next we stamped the coordinating outline images over the coloured images, all using Baked Brown Sugar ink. Then we sponged the edges with a little Soft Suede ink. Finally, we stamped the Sentiment with VersaMark ink, and sprinkled on some Gold Embossing Powder which we melted with the Heat Tool. I took about 20 pictures of this card, but none were able to capture the way it looks in real life. The gold really stands out against the muted autumn colours. 


Then we used up some retired DSP to make this adorable, I mean spooky, Halloween treat holder.  This project only requires a few products, was simple and really fast.  We used the amazing Envelope Punch Board and the measurements for a gift card holder to make these, which means you only need a 5x5 piece of paper!  We added a little ribbon and that same image from Tags 4 You.  Slide in a Halloween candy bar and we're done!  Five minute project. Love that!  These could easily be made for any holiday or occasion.  It even looks cute with just the little bit of ribbon and nothing else.

Sometimes it's good to get back to stamping basics and create projects that remind you of what attracted you to paper crafting in the first place. What is your favorite simple technique?  

Go stamp something!
Diane

Wednesday, September 18, 2013

Stamp Club Class

Tonight's class was all about the Envelope Punch Board!  All the ladies loved using the punch board, it's simple and quick and the results are great every time!  We warmed up by making envelopes for this card:


The card is on a Pumpkin Pie base, the stripes on the white layer are made using the masking tape technique in Crumb Cake and Soft Suede. The leaves are die cut with the Autumn Accents Bigz Die and the Big Shot, then stamped with the Wonderfall stamp set in Cajun Craze, Crushed Curry, Early Espresso and Soft Suede. The thank u is cut with the Expressions Thinlits in Red Glimmer Paper (cut down from the word Thankful). 

Our next project used the Envelope Punch Board to make a file folder card:
 
We glued the hexagon pattern of Epic Day Designer Series Paper onto the card front and the lined paper pattern to the edge of the inside, then we used the punch on the punch board to get the curved shape for the file folder tabs (like in the video from this post). To finish the card we stamped you make me happy from Hello Lovely in Calypso Coral and mounted it on the front, and we stamped XOXO from Oh, Goodie!, also in Calypso Coral on the tab. Cute!!  Stamping with friends is so much fun, do you have someone to stamp with?  You are always welcome to come and join us!

Go stamp something!
Diane


Monday, September 16, 2013

Envelope Punch Board Love

Hi Stampers!

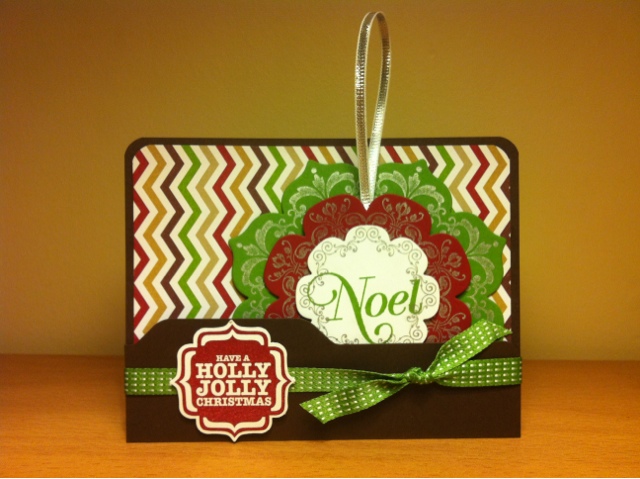
This punch board is the coolest new tool!  I've only had a couple of hours to play with it but I love it!!  Of course it makes beautiful, polished looking envelopes out of any type of paper you like, but you can also make boxes, scrapbooks, and cards with little tabs that look like file folders!  I followed Patty Bennett's tutorial (that I shared on Friendly Friday) and made this pocket card that holds a simple ornament:

 
The base is a 5-1/2 x 6 piece of Early Espresso cardstock, lined with DSP from the Season of Style Paperstack. Have a Holly Jolly Christmas from Tags 4 You is stamped in Cherry Cobbler and punched out with the Label Bracket Punch.  (you can get these in a bundle and save!)  That cute tab you see on the Early Espresso cardstock is made with one of the punches on the new amazing Envelope Punch Board!  Add it to your must have list now!!
 

The ornament is made with the Daydream Medallions stamp set inked with the Silver Metallic Encore Pad, stamped onto Gumball Green, Cherry Cobbler and Whisper White cardstock.  The layers are cut out with the Floral Frames Framelits Dies and the Big Shot. Noel is from Greetings of the Season and the hanger is made with some Silver 1/8" Ribbon from the Holiday Catalogue.  Doesn't it make you want to start preparing for the holidays?

Go stamp something!
Diane


Saturday, September 14, 2013

Friendly Friday

Hi Stampers!

I know it's Saturday.  I was worn out after my first full week at school with the students, and even though I knew exactly what I wanted to post, I just couldn't drag myself off the couch!  I am super excited about the new Envelope Punch Board, so today I am sharing some videos by Patty Bennett at Patty's Stamping Spot.

Envelope-punch-board-samples

I chose Patty's videos, because she not only shows you how easy it is to make these envelopes with the punch board, but also some super cute file folder cards:

Envelope-punch-board-file-folder-cards

Click on the photos to go to Patty's blog posts and view her videos.  I can't wait to use the punch board to shrink down my pile of retired designer series papers!  We'll be trying out this tool at Stamp Club Class this Wednesday.  Would you like to join us?  Email me to get more information about Stamp Club.

Go stamp something!
Diane