Monday, September 30, 2013

Goody Gear!

Hi Stampers!

Need some cute but fast and easy treats for Thanksgiving, Halloween or Christmas?  Here's all you need:


The Goody Gear Simply Created Kits come in two different colours, Real Red, which I used for a Christmas treat and Pumpkin Pie, which I used for Thanksgiving and Halloween. 

Real Red Goodie Gear Simply Created KitOh Goodie! Clear-mount Stamp SetPumpkin Pie Goodie Gear Simply Created Kit

The kits are only $6.95 each and come with enough supplies to make 10 treat bags.  The enjoy and Ho Ho Ho come from the coordinating stamp set, Oh, Goodie!  The only extra supplies you need are ink and little adhesive and you're good to go!  Or better yet, get some friends together and host a private class, then you get to make your treats together and you earn free Stampin' Up! product as the hostess, double treats for you!

Who do you know that could use a treat?

Go stamp something!
Diane

Wednesday, September 25, 2013

Epic Lacy & Lovely

Hi Stampers!

I saw this great card made with an interesting fold on Dawn Griffith's blog and just had to make one:


Dawn made a Halloween card, but I followed her instructions using Epic Day DSP and the Lacy & Lovely stamp set to make an everyday card instead. 
 

I love the way this card showcases both sides of the gorgeous DSP!  Choosing the card stock and ink colours was a no brainer since I just used colours that are in the DSP, which are listed on the back of the package as well as in the catalogue.
 

I also love that I had this card made in less than ten minutes using scraps of card stock and designer paper, and it's beautiful on the inside too!  I was going to stamp either the Miss you or Thank you image from Lacy & Lovely on the inside, but  I haven't decided who I'm giving this too yet, so I guess I'll wait and add that when I know what I'm using this card for.  Do you have some scraps and ten minutes?
 
Go stamp something!
Diane


Friday, September 20, 2013

Friendly Friday

Hi Stampers!

I think these are just adorable:

IMG_2063

These were made by Susan Itell from Simple Stampin and I love them sooooo much!  She used the Halloween Hello stamp set, which I don't have, but any smaller image would do. 

Halloween Hello Clear-mount Stamp SetIMG_2065
 
These would made awesome little treats (or stocking stuffers) when you're trying not to give junk food.  I have a feeling my coworkers will be seeing a version of these in the near future!  Click on the photo above to get Susan's full detailed tutorial.  Do you know someone who would love to receive one of these?

Go stamp something!
Diane

Wednesday, September 18, 2013

Stamp Club Class

Tonight's class was all about the Envelope Punch Board!  All the ladies loved using the punch board, it's simple and quick and the results are great every time!  We warmed up by making envelopes for this card:


The card is on a Pumpkin Pie base, the stripes on the white layer are made using the masking tape technique in Crumb Cake and Soft Suede. The leaves are die cut with the Autumn Accents Bigz Die and the Big Shot, then stamped with the Wonderfall stamp set in Cajun Craze, Crushed Curry, Early Espresso and Soft Suede. The thank u is cut with the Expressions Thinlits in Red Glimmer Paper (cut down from the word Thankful). 

Our next project used the Envelope Punch Board to make a file folder card:
 
We glued the hexagon pattern of Epic Day Designer Series Paper onto the card front and the lined paper pattern to the edge of the inside, then we used the punch on the punch board to get the curved shape for the file folder tabs (like in the video from this post). To finish the card we stamped you make me happy from Hello Lovely in Calypso Coral and mounted it on the front, and we stamped XOXO from Oh, Goodie!, also in Calypso Coral on the tab. Cute!!  Stamping with friends is so much fun, do you have someone to stamp with?  You are always welcome to come and join us!

Go stamp something!
Diane


Monday, September 16, 2013

Envelope Punch Board Love

Hi Stampers!

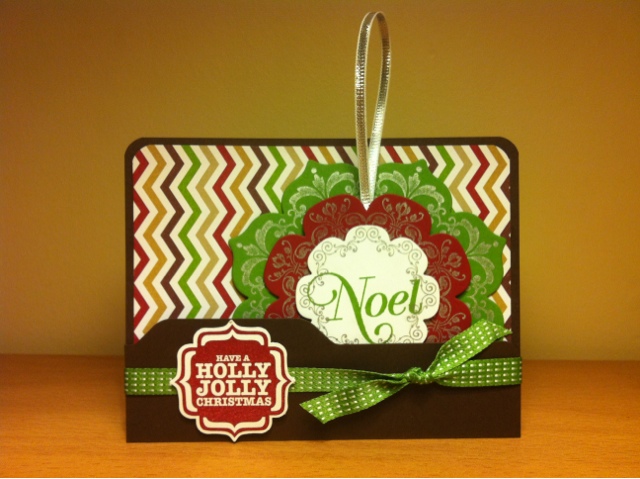
This punch board is the coolest new tool!  I've only had a couple of hours to play with it but I love it!!  Of course it makes beautiful, polished looking envelopes out of any type of paper you like, but you can also make boxes, scrapbooks, and cards with little tabs that look like file folders!  I followed Patty Bennett's tutorial (that I shared on Friendly Friday) and made this pocket card that holds a simple ornament:

 
The base is a 5-1/2 x 6 piece of Early Espresso cardstock, lined with DSP from the Season of Style Paperstack. Have a Holly Jolly Christmas from Tags 4 You is stamped in Cherry Cobbler and punched out with the Label Bracket Punch.  (you can get these in a bundle and save!)  That cute tab you see on the Early Espresso cardstock is made with one of the punches on the new amazing Envelope Punch Board!  Add it to your must have list now!!
 

The ornament is made with the Daydream Medallions stamp set inked with the Silver Metallic Encore Pad, stamped onto Gumball Green, Cherry Cobbler and Whisper White cardstock.  The layers are cut out with the Floral Frames Framelits Dies and the Big Shot. Noel is from Greetings of the Season and the hanger is made with some Silver 1/8" Ribbon from the Holiday Catalogue.  Doesn't it make you want to start preparing for the holidays?

Go stamp something!
Diane


Saturday, September 14, 2013

Friendly Friday

Hi Stampers!

I know it's Saturday.  I was worn out after my first full week at school with the students, and even though I knew exactly what I wanted to post, I just couldn't drag myself off the couch!  I am super excited about the new Envelope Punch Board, so today I am sharing some videos by Patty Bennett at Patty's Stamping Spot.

Envelope-punch-board-samples

I chose Patty's videos, because she not only shows you how easy it is to make these envelopes with the punch board, but also some super cute file folder cards:

Envelope-punch-board-file-folder-cards

Click on the photos to go to Patty's blog posts and view her videos.  I can't wait to use the punch board to shrink down my pile of retired designer series papers!  We'll be trying out this tool at Stamp Club Class this Wednesday.  Would you like to join us?  Email me to get more information about Stamp Club.

Go stamp something!
Diane

Wednesday, September 11, 2013

Thankful Wonderfall


Do you love the Wonderfall stamp set as much as I do?  It just makes me happy every time I  pull it off the shelf!


I have to say, I would love it even more if there were framelits that coordinated, but it came out before Stampin' Up! started to carry them, so I guess we'll have to make due with the Autumn Accents Bigz Die. Since you can't stamp your image and then line it up to cut it out like you can with your framelits, we have to do things a little differently. For this set, run your cardstock through the big shot first to cut out your leaf shapes, then stamp them. If your image is a bit crooked it's okay, because once you sponge the edges, which makes them look more realistic and beautiful anyway, you can't tell!  I got the basic idea for this layout from a project I saw on Pinterest made by Dani Dziama. 

For those of you wondering if it's tricky to work with the Expressions Thinlits Dies, the answer is yes, unless you put a little piece of wax paper I between the die and the cardstock:


A feature of these framelits that can be really helpful is that it has some tiny holes on the back of the die.  If you poke a toothpick through those tiny holes, your cardstock pops right out. Then all you need to do is add a bit of Tombo liquid glue and you're set!  

What stamp set makes you happy every time you see it?

Go stamp something!
Diane