Wednesday, October 30, 2013

Altered Designer Series Paper

Hi Stampers!

I saw this card online by Karen Day and immediately knew I wanted to make a version of it:


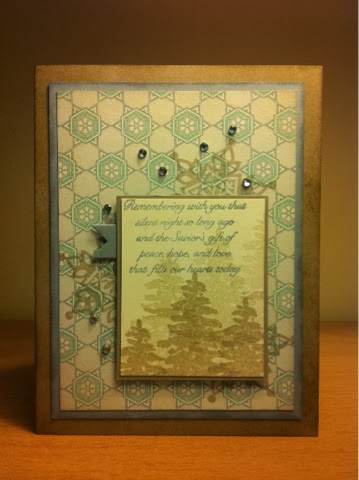
At first I thought it was made with Stampin' Up! products, but upon closer inspection I realized it wasn't, but was still inspired to make something like it. Here's my ,less professionally photographed, card:


I used Festive Flurry and Evergreen stamp sets, Crumb Cake and Smoky Slate card stock and ink. I did use Winter Frost DSP, but it was too crisp and white for this card, so I sponged it all over with Very Vanilla ink:
 

In this picture you can kind of see how the sponged DSP has a softer more vintage feel to it. For a finishing touch a added some tiny Rhinestones for a little Christmas sparkle :)

Go stamp something!
Diane


Monday, October 28, 2013

Card in a Box

Hi Stampers!

So I just had to try the card in the box I posted a link to on Friendly Friday, and I love it!  Here's how mine turned out:

 
I used Crumb Cake cardstock for the base, Season of Style Designer Series Paper, the Festive Flurry stamp set and coordinating framelits, a little Cherry Cobbler 1" Grosgrain Ribbon and the sentiment is from Joyful Christmas.  On the video all of the measurements are in centimetres, but our Stampin' Up! paper cutters have all of the measurements in both centimetres and inches, so that was no problem.  Our paper is half an inch shorter, so using her measurements there is no tab.  Instead I used a piece of scrap glued to both edges on the inside to hold the box together.  Here's a view from of the side:
 

Do you love it too?  It takes a bit longer than the cards I usually post, but the extra time certainly pays off when someone opens it and all those flaps pop open!  When this card is flat it is larger than a standard card, so I used my Envelope Punch Board to make a 6" x 6 1/2" envelope with Crumb Cake card stock. 


This was a very satisfying way to pass an afternoon, I recommend giving it a try when you have a little time for stamping set aside. 

Go stamp something!
Diane


Friday, October 25, 2013

Friendly Friday

Hi Stampers!

I saw this card on pinterest and I LOVE it!  I was happy to discover that Monica Gale, the blogger who made this card, posted a video of how to make it:

card in a box video-001
 
 
The only thing about this video is that Monica is in the UK, so she uses A4 paper, which is a bit longer than ours, and her measurements are metric, however, the concept of this card is fantastic and I'm sure it won't take much to duplicate this card with our card stock.  I'll definitely be giving this a try over the weekend!
 
If you beat me to it please post a link to your card or some tips in the comments for the rest of us!
 
Go stamp something!
Diane


Tuesday, October 22, 2013

For one week only--25% off 25 stamps!!

Hi Stampers!

Look what Stampin' Up! announced this morning:


This sale is only on for one week!  I'll be placing an order on the weekend, if you live  near me contact me I can add your items to my order, or you can order online by clicking here.  If you don't live near me but are not comfortable with placing an online order, contact me and I can place your order for you.  To view the stamp sets you can also click on the list above, they picked some great sets for this sale!
 
Go stamp something!
Diane


Monday, October 21, 2013

Merry Little Christmas

Hi Stampers!

Here's a different Christmas card using the stamp set, Merry Little Christmas from the simply created bundle:


I saw this on Pinterest and just had to make it!  It uses a standard Garden Green base, Season of Style DSP from the paper stack, Baked Brown Sugar, Early Espresso, Basic Black and Real Red card stock and the following punches: 
 
 
The antlers were made with a retired snowflake punch, and the greeting was stamped in Whisper White ink.  I started to draw the doodle lines with my white signo gel pen, but I guess I haven't used it in a while and I couldn't get the ink flowing, I'll have to see if I can rectify that.  For now I decided to use a silver stampin' dazzle marker as a substitute.  The other details were drawn in with an Early Espresso stampin' write marker.
 
This was a nice way to unwind after a busy day, and stamping is way cheaper than therapy!

Go stamp something!
Diane

Thursday, October 17, 2013

Stamp Club

Hi Stampers!

At stamp club class tonight we focused on seasonal projects. The first project we made used the stunning Festive Flurry stamp set embossed in white on Island Indigo card stock:


I know you're thinking, "it's cute"  but wait for the wow when you open it:


We used the --- framelits to die cut the Island Indigo piece and the white frame around it. The die cut pieces are glued to the Pool Party card base which is layered with --- DSP. 


We used the leftover piece from the white frame inside our card to have a cute place to write a message. 

Our second project is a Halloween treat box:


I saw this box on Pinterest and knew we had to make it!  The box is made with a 4-1/4 x 7-1/4 Pumpkin Pie card stock scored at 1" along both long sides, and 2,3,5 & 7 the short way. A little sticky strip and the box is assembled. To decorate we added some Witches Brew washi tape and the Trick or Treat image from Tags 4 You adhered with Stampin' Dimensionals acts as a closure for the box. 

Our last project was super quick since we used the Merry Little Christmas Card Simply Created Kit:


It comes with all of the paper and bakers twine precut and ready to stamp and adhere. The only other things you need are stamps and ink. We used the recommended Merry Little Christmas stamp set. 

What a fun night, thanks ladies!!

Go stamp something!
Diane

PS: I"ll be back later to add the links to the products used and a tutorial for the treat box


Monday, October 14, 2013

Happy Thanksgiving!

My project today couldn't be much simpler:


Every year I make cranberry sauce for the kids teachers and my coworkers and family. This year with kids in two different schools I made 40 jars so the labels needed to be quick and easy. I simply stamped the leaf and outline images from Gently Falling onto Very Vanilla card stock and punched them out with the large tag punch. I wrote people's names with a gold Stampin' Dazzle marker, and if they needed to be signed (the ones dropped off at the high school) I mounted them on a 1-3/4 x 4 piece of Baked Brown Sugar folded in half. 

Happy Thanksgiving Canadian friends...
Go stamp something!
Diane

Wednesday, October 9, 2013

So Much News!

Hi Stampers!

I've been off my computer fighting a cold for the past week, and there have been tons of announcements from Stampin' Up!

 
1.) From now until October 21st you can join the Stampin' Up! family for only $25!  This has never happened before.
 
If  you like the idea of a 20% discount on your favorite products and a chance to earn extra cash, along with tons of exclusive creative ideas at your fingertips and no strings attached, message me for more information!

Weekly Deals
2.) Weekly Deal Surprise!               
SU! will be offering a weekly deal in the online store that will change every Tuesday. Check out the deal every Tuesday and place their order right away for these great, discounted products as weekly deals will be offered while supplies last! The discount will appear in your shopping bag when you check out.

This weeks deals are:
Chevron Textured Impressions Embossing Folder
Price: $9.95
Essentials Paper-Piercing Pack
Price: $10.95
Festive Paper-Piercing Pack
Price: $10.95
Petite Curly Label Punch
Price: $15.95
Squares Collection Framelits Dies
Price: $32.95
Today & Everyday Designer Photobook Template -- Digital Download
Today & Everyday Designer Photobook Template - Digital Download
Price: $16.50


3. Our new Pop & Place Holiday Gift Tags come in a booklet of 70+ tags in five designs--created from our existing punch and die shapes. These tags coordinate with the Season of Style products in the 2013 holiday catalog.
 
Christmas Tagables Photopolymer Stamp Set
 
There are a few different options to choose from depending on your needs:

ItemDescriptionPrice
134975   Pop & Place Holiday Gift Tags Book $11.95
 
134623  
   Christmas Tagables Photopolymer Stamp Set
$16.95
135921  
  
   Pop & Place Holiday Gift Tags Bundle includes
  • Pop & Place Holiday Gift Tags Book 
  • Christmas Tagables Photopolymer Stamp Set
$22.95
135290  

   Pop & Place Holiday Gift Tags Starter Bundle includes
  • Pop & Place Holiday Gift Tags Book 
  • Christmas Tagables Photopolymer Stamp Set
  • Soft Suede Classic Stampin' Spot
  • Clear Block C
$27.95
  
   
Hopefully I haven't missed anything!  If you have any questions please don't hesitate to contact me.

Go stamp something!
Diane


Wednesday, October 2, 2013

Stamping 101

Hi Stampers!

So the whole concept behind Stamping 101 is that we use simple techniques to create projects that are cute or beautiful, but that don't require too many products or a lot of time. Last night I think we really met that goal. We made 3 projects and were done in 45 minutes!


Our first project was this Trick or Treat card. This card was simple, and didn't take too long, but we did use a fair amount of product.  We used the retired spider web embossing folder on Basic Grey card stock, then ran the Silver Encore Pad really lightly over the raised web design. A little strip of each design from the  Witches Brew Designer Washi Tape add some colour and interest. Finally, we stamped the Trick or Treat image from Tags 4 You on Very Vanilla, punched it out with the Bracket Label Punch and attached it with a Stampin' Dimensional


Next up, a card with no layers, no Big Shot, no punches. This card uses the magic of two-step stamping!  This card was simple and we didn't need a lot of products, but it took a little bit longer to stamp.  We started by stamping the different leaves from Gently Falling; each in a different colour onto Baked Brown Sugar card stock. We used Cajun Craze, Daffodil Delight, Pumpkin Pie, Pear Pizzaz, and Crumb Cake ink.

Gently Falling Clear-Mount Stamp SetTags 4 You Wood-mount Stamp Set

Next we stamped the coordinating outline images over the coloured images, all using Baked Brown Sugar ink. Then we sponged the edges with a little Soft Suede ink. Finally, we stamped the Sentiment with VersaMark ink, and sprinkled on some Gold Embossing Powder which we melted with the Heat Tool. I took about 20 pictures of this card, but none were able to capture the way it looks in real life. The gold really stands out against the muted autumn colours. 


Then we used up some retired DSP to make this adorable, I mean spooky, Halloween treat holder.  This project only requires a few products, was simple and really fast.  We used the amazing Envelope Punch Board and the measurements for a gift card holder to make these, which means you only need a 5x5 piece of paper!  We added a little ribbon and that same image from Tags 4 You.  Slide in a Halloween candy bar and we're done!  Five minute project. Love that!  These could easily be made for any holiday or occasion.  It even looks cute with just the little bit of ribbon and nothing else.

Sometimes it's good to get back to stamping basics and create projects that remind you of what attracted you to paper crafting in the first place. What is your favorite simple technique?  

Go stamp something!
Diane